Hey! Sorry about the absence......again.
So, I haven't unloaded my camera for about a month. I had quite a few miscellaneous pics on there and I won't show you them all but, I did want to show you these:
About a month ago I pulled my carrots. And trimmed back the chili plants. Those are Poblanos. I planted 2 different kinds of carrots this year. They both tasted really good. In fact I had cooked some for dinner and the Hubs said, "they taste carrotier." Okaaaaaaaay.......
So do you see those ones on the far left there?
If you don't thin your carrot patch when they are small, you might get this. Hmmm........and now I'm speechless because anything I think of saying right now is inappropriate. So I'll just leave it at that.
I am taking 17 on a college tour out of town tomorrow and we won't be back until really late Monday night so I knew I needed to get Grace's teacher Valentines done before I left.
Then I thought I'd make a point of posting them here so maybe you might get inspired to make some teacher Valentines too.................well, if you needed any, that is.
I {heart} Hearts set. Crumb cake, whisper white and real red cardstock. Real red and pretty in pink inks. Lable Framelits, polka dot embossing folder, big shot, cherry cobbler twine, small heart punch.
These were pretty darn simple to make. For the smaller ones, I just cut one of the largest Framelits. For the big ol' Hershey bar I had to cut 2 of the large ones, cut them down and glue together.
After I cut the Framelit, I embossed it with the polka dots. The tag is just the smallest Framelit. Love that baker's twine!
This is one of those peanut butter Snicker squares. They are about 1" thick so I scored 1/2" of either side of the middle of the die cut and folded. Doesn't get much easier. Let me know if you have any questions.
Alrighty then, I haven't had much, if any, computer time lately and I have a squillion emails to go through. But its going to have to wait until Tuesday. I hate having a clogged inbox. Or maybe Wednesday. I forgot that I have to make Valentine's for my family when I get back. It would be very unlike me to be ahead on too many things.
Thanks so much for your continued patience and visiting even though I've been very inconsistent. Things will smooth out.......promise.
Blessings, b.
Showing posts with label I {heart} hearts. Show all posts
Saturday, February 11, 2012
Monday, August 15, 2011
these hands
Hey!
I've got another losing Artisan Award project to show you. ( The Boy just read that sentence and said, "Well, thats being positive.")
Last year I really struggled with my scrap pages but this year, I love them. I think they each turned out great. I wish I still had them. I do have pics although the pictures are horrible. We actually unpacked the box to take them because I forgot to do it beforehand. So click on it to make it bigger to see the detail.
I {heart} Hearts and Wonderful Favorites. Crumb cake and very vanilla cardstock. Either Baja Breeze or Marina Mist (not sure which) and crumb cake inks. Dotted ribbon punch, Springtime Vintage DSP, clearlits rectangle die, big shot, neutrals buttons, hemp or linen thread, dimensionals, naturally serif alpha die, newsprint DSP, neutrals patterned paper pack.
I loved the idea of this page. We actually took pictures of my hands. I wanted pictures of my MIL hands but we were running out of time.
Looks like I really need to invest in some good moisturizer.
I think I'll do this page again but with her hands. I love looking at hands. If you think about it, they have such stories to tell. I would love to create a reminder of what her hands look like. I still remember what my mom's hands looked like, I wish I had a picture though.
This is a pretty self explanatory page but let me know if you have any questions.
In other news, I ordered a whole mess of Stampin' Up! goodies last week and they are on their way here! Super excited! Wait until you see the Holiday Mini Catalog! WOW! Lots of nifty stuff in there.
Alrighty then, 17 and I are going to watch last night's Next Food Network Star. I want Susie to win.
Thanks for stopping by and hanging out and checking in and looking around and well..........you know. I love when you stop by.
Blessings, b.
I've got another losing Artisan Award project to show you. ( The Boy just read that sentence and said, "Well, thats being positive.")
Last year I really struggled with my scrap pages but this year, I love them. I think they each turned out great. I wish I still had them. I do have pics although the pictures are horrible. We actually unpacked the box to take them because I forgot to do it beforehand. So click on it to make it bigger to see the detail.
I {heart} Hearts and Wonderful Favorites. Crumb cake and very vanilla cardstock. Either Baja Breeze or Marina Mist (not sure which) and crumb cake inks. Dotted ribbon punch, Springtime Vintage DSP, clearlits rectangle die, big shot, neutrals buttons, hemp or linen thread, dimensionals, naturally serif alpha die, newsprint DSP, neutrals patterned paper pack.
I loved the idea of this page. We actually took pictures of my hands. I wanted pictures of my MIL hands but we were running out of time.
Looks like I really need to invest in some good moisturizer.
I think I'll do this page again but with her hands. I love looking at hands. If you think about it, they have such stories to tell. I would love to create a reminder of what her hands look like. I still remember what my mom's hands looked like, I wish I had a picture though.
This is a pretty self explanatory page but let me know if you have any questions.
In other news, I ordered a whole mess of Stampin' Up! goodies last week and they are on their way here! Super excited! Wait until you see the Holiday Mini Catalog! WOW! Lots of nifty stuff in there.
Alrighty then, 17 and I are going to watch last night's Next Food Network Star. I want Susie to win.
Thanks for stopping by and hanging out and checking in and looking around and well..........you know. I love when you stop by.
Blessings, b.
Wednesday, April 27, 2011
back to normal around here
Hey everyone! I'm happy that everyone's vacations are over and we are all back on schedule around here.
It would have been great if our vacations had been at the same time. But as soon as I went back to work, the kids had off. Bummer!
So how was Easter? We had a quiet one here. The boy got his wisdom teeth out on Good Friday and he was not good company.
Grace made some awesome Easter cards this year. She was bored on vacation while mom was at work. Check this kid out:
This was all her doing. I came home from work and this was on my desk. This kid rocks! Look at the detail:
She loves to stamp. When I have a class at our house, all the other family members disappear. Not Grace. She is right in there helping out. So funny. This card went to gramma and grandpa.
Look what she made us for Easter morning:
We each got our own card in our favorite colors. Can you guess which one is mine? I'll give you a hint: it starts with crumb and ends with cake.
I have a little box with leftover letters from the Naturally Serif Alpha die cut and she went through there and picked out letters. She said the words were in the shape of the cross. Clever girl! This was another thing she just did on her own. I don't know where she gets these ideas. Love that girl!
Mother's Day is coming up you know. Are you ready? Me neither.
The other day I had a friend ask me how to make a circle fan and rather than try to explain it to her, I decided to do a picture tutorial. It was the perfect opportunity to make a Mother's Day card.
How to make a circle fan:
First decide how big you want your circle to be. Then cut 2 pieces of DSP a little more than half that size. So, if you want a 4" circle then cut your strips at 2 1/4" x 12. I cut mine at 1 1/2" x 12". I didn't need that big of a circle fan.
For this fan I decided to use my scallop border punch on the edges before I scored them
For this strip I scored it between each scallop. Can you see the score lines? Which came out to every 3/8". Usually when I make a circle fan, I'll score it every 1/4". It won't be as bulky if you were mailing it.
Then using my super duper Tombow Multi glue, glue 2 ends together. You can use tape. I just like the glue.
Make sure you match up the folds when you glue/tape it.
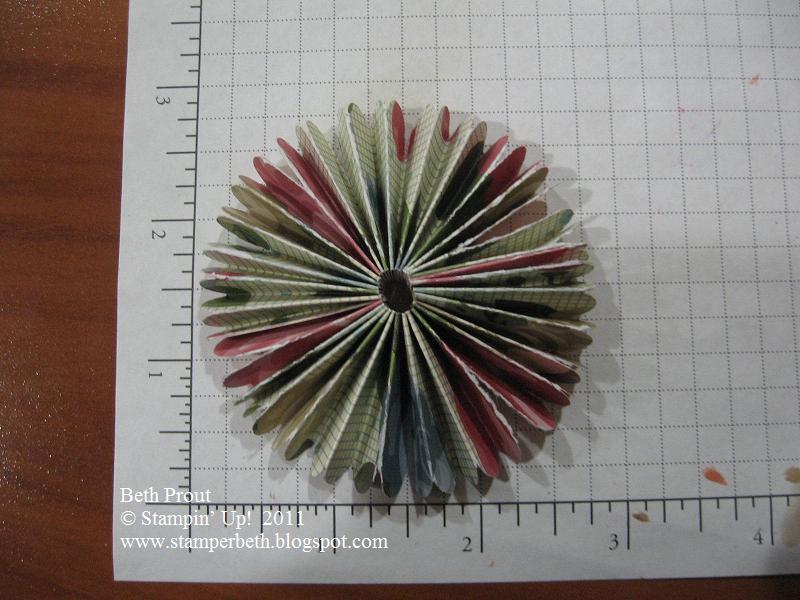
Then glue the other ends together and you'll end up with this funky circle. This is when you would punch out a circle of cardstock. I punched a 1 3/8" circle but didn't get a pic of it. Put tape over the whole surface of the punched circle. Set it aside.
I also forgot to take a pic of me pushing this circle flat and then gathering it up to get this:
Once you have this, carefully pick it up and put it on top of your sticky punched circle. Press it down without squashing it.
Here is what the backside looks like. It doesn't matter if the circle is centered on the back. No one will see it.
I cut my strips 1 1/2" x 12" and it made a 2 3/4" circle fan.
Now, I don't like this particular pattern of DSP so I made another circle fan out of cardstock.
Lesson learned:
Making the gathered up cardstock circle stick to the sticky punched circle was next to impossible. The cardstock is so much stronger than the DSP. Lighter weight paper works better.
But of course I couldn't let it go and made it work. What did I use to strong arm it? Tombow Multi Glue. Love that stuff!
I {heart} hearts and Wonderful Favorites stamps. Very vanilla, old olive and crumb cake cardstock. Pretty in pink and rose red inks. Vanilla seam binding, little leaves die, big shot, polka dot embossing folder, cutter kit, Springtime Vintage DSP, scallop border punch.
I don't love this card. Its okay. Not sure I'll send it to her.
Here's another example of me being a dork. I had made the edges scalloped like on the DSP one but, when I flattened it and gathered it, I put the scallops on the inside of the circle. DUH!
I used the Cutter Kit to rough up the edges of the little circle. This heart stamp actually says "friend" in the middle. I covered it.
This one was also scored at 3/8" and you can see how much it sticks out. Scoring at 1/4" would make it lie a little flatter.
So there ya go. Thats how you make a circle fan. If you decide to try it, show me. I would love to see your creations.
Alrighty then, like I said, we are back on normal schedule here. I have lots to show you and should have more regular posting going on. Thanks so much for keeping the blog warm while I've been busy.
Blessings, b.
It would have been great if our vacations had been at the same time. But as soon as I went back to work, the kids had off. Bummer!
So how was Easter? We had a quiet one here. The boy got his wisdom teeth out on Good Friday and he was not good company.
Grace made some awesome Easter cards this year. She was bored on vacation while mom was at work. Check this kid out:
This was all her doing. I came home from work and this was on my desk. This kid rocks! Look at the detail:
She loves to stamp. When I have a class at our house, all the other family members disappear. Not Grace. She is right in there helping out. So funny. This card went to gramma and grandpa.
Look what she made us for Easter morning:
We each got our own card in our favorite colors. Can you guess which one is mine? I'll give you a hint: it starts with crumb and ends with cake.
I have a little box with leftover letters from the Naturally Serif Alpha die cut and she went through there and picked out letters. She said the words were in the shape of the cross. Clever girl! This was another thing she just did on her own. I don't know where she gets these ideas. Love that girl!
Mother's Day is coming up you know. Are you ready? Me neither.
The other day I had a friend ask me how to make a circle fan and rather than try to explain it to her, I decided to do a picture tutorial. It was the perfect opportunity to make a Mother's Day card.
How to make a circle fan:
First decide how big you want your circle to be. Then cut 2 pieces of DSP a little more than half that size. So, if you want a 4" circle then cut your strips at 2 1/4" x 12. I cut mine at 1 1/2" x 12". I didn't need that big of a circle fan.
For this fan I decided to use my scallop border punch on the edges before I scored them
For this strip I scored it between each scallop. Can you see the score lines? Which came out to every 3/8". Usually when I make a circle fan, I'll score it every 1/4". It won't be as bulky if you were mailing it.
Then using my super duper Tombow Multi glue, glue 2 ends together. You can use tape. I just like the glue.
Make sure you match up the folds when you glue/tape it.
Then glue the other ends together and you'll end up with this funky circle. This is when you would punch out a circle of cardstock. I punched a 1 3/8" circle but didn't get a pic of it. Put tape over the whole surface of the punched circle. Set it aside.
I also forgot to take a pic of me pushing this circle flat and then gathering it up to get this:
Once you have this, carefully pick it up and put it on top of your sticky punched circle. Press it down without squashing it.
Here is what the backside looks like. It doesn't matter if the circle is centered on the back. No one will see it.
I cut my strips 1 1/2" x 12" and it made a 2 3/4" circle fan.
Now, I don't like this particular pattern of DSP so I made another circle fan out of cardstock.
Lesson learned:
Making the gathered up cardstock circle stick to the sticky punched circle was next to impossible. The cardstock is so much stronger than the DSP. Lighter weight paper works better.
But of course I couldn't let it go and made it work. What did I use to strong arm it? Tombow Multi Glue. Love that stuff!
I {heart} hearts and Wonderful Favorites stamps. Very vanilla, old olive and crumb cake cardstock. Pretty in pink and rose red inks. Vanilla seam binding, little leaves die, big shot, polka dot embossing folder, cutter kit, Springtime Vintage DSP, scallop border punch.
I don't love this card. Its okay. Not sure I'll send it to her.
Here's another example of me being a dork. I had made the edges scalloped like on the DSP one but, when I flattened it and gathered it, I put the scallops on the inside of the circle. DUH!
I used the Cutter Kit to rough up the edges of the little circle. This heart stamp actually says "friend" in the middle. I covered it.
This one was also scored at 3/8" and you can see how much it sticks out. Scoring at 1/4" would make it lie a little flatter.
So there ya go. Thats how you make a circle fan. If you decide to try it, show me. I would love to see your creations.
Alrighty then, like I said, we are back on normal schedule here. I have lots to show you and should have more regular posting going on. Thanks so much for keeping the blog warm while I've been busy.
Blessings, b.
Wednesday, February 16, 2011
She's Alive!!
Hey stampers! Another round of the Creeping Crud has come to live at our house. Even my trusty Nyquil wasn't kicking it. But I persevered and fought the good fight and have beaten it into submission............for now.
It has been rampant throughout my school and I've become best friends with hand sanitizer. Why don't parents teach their children to cough or sneeze into their arm? I can't tell you how many times in the past 3 weeks I've said, "cough into your elbow (I model this for them because they've only seen me or their teacher model it a thousand times and apparently they need a thousand and one or two). We don't want your germs."
I visit 5 classrooms a day. You would think I would be immune to germs by now...........or dead.
So anyhow, I've really missed you. I think about you all the time. I have been stamping and have new goodies to show you. Its just that by the time all my chores are done for the day, I'm just to tired to talk to you.
Don't take it personally.
So today I want to show you the Valentine goodies I made for my family.
(Holy Cow! I just went and put my watermark on all the pics and there are so many! So I'll just be showing you the men's projects today)
Woodgrain background, I {heart} hearts and Well scripted (retired). Soft suede, whisper white and crumb cake cardstock. Black Stazon, Soft suede and Riding hood read inks. Corner rounder, natural hemp, misc. white button and dimensionals.
My husband works with wood all the time. So most every card I make for him has a wood theme. I thought the button might be pushing it but, it needed it.
I freehanded the heart and put 4 dimensionals in the center and then just one on each side. I wanted it to really stand out.
This is what the kids Valentine's started out as. Sometimes hoarding cans, bottles, tiles, wood chips, candles, misc. game pieces, etc.....are a good thing. Funny how they are pretty much the same size. Lucky for me because they practically measure things just to make sure no one gets more than the other. Geesh!
Well Scripted (retired) and Woodgrain background. Crumb cake, riding hood red and choc. chip cardstock. Black Stazon and crumb cake ink. Heart to heart punch, dimensionals and DSP that retired about a million years ago.
Every year I make a special little something to hold a little something for the kids for Valentine's Day, and every year my boy gives his back.............after the candy is gone.
Several years ago I made my hubby a "Can O' Love" out of a Pringles can and decorated it with this paper. Everytime there is a special holiday or occasion I fill it with candy for him. He LOVES candy! So this is a "Can O' Love" for my boy. We'll see if he keeps this or not. I don't have my hopes up.
So there ya go! The cans I made for the girls are much more involved. But they keep the things I make them so I put a little more effort into it.
Alrighty then, time for bed.
Thanks so much for continuing to stop by and check up on me. I've disenfected things so many times I don't see how any germs are left and I hope to be back to a more regular blogging schedule. I miss you guys.
Blessings, b.
It has been rampant throughout my school and I've become best friends with hand sanitizer. Why don't parents teach their children to cough or sneeze into their arm? I can't tell you how many times in the past 3 weeks I've said, "cough into your elbow (I model this for them because they've only seen me or their teacher model it a thousand times and apparently they need a thousand and one or two). We don't want your germs."
I visit 5 classrooms a day. You would think I would be immune to germs by now...........or dead.
So anyhow, I've really missed you. I think about you all the time. I have been stamping and have new goodies to show you. Its just that by the time all my chores are done for the day, I'm just to tired to talk to you.
Don't take it personally.
So today I want to show you the Valentine goodies I made for my family.
(Holy Cow! I just went and put my watermark on all the pics and there are so many! So I'll just be showing you the men's projects today)
Woodgrain background, I {heart} hearts and Well scripted (retired). Soft suede, whisper white and crumb cake cardstock. Black Stazon, Soft suede and Riding hood read inks. Corner rounder, natural hemp, misc. white button and dimensionals.
My husband works with wood all the time. So most every card I make for him has a wood theme. I thought the button might be pushing it but, it needed it.
I freehanded the heart and put 4 dimensionals in the center and then just one on each side. I wanted it to really stand out.
This is what the kids Valentine's started out as. Sometimes hoarding cans, bottles, tiles, wood chips, candles, misc. game pieces, etc.....are a good thing. Funny how they are pretty much the same size. Lucky for me because they practically measure things just to make sure no one gets more than the other. Geesh!
Well Scripted (retired) and Woodgrain background. Crumb cake, riding hood red and choc. chip cardstock. Black Stazon and crumb cake ink. Heart to heart punch, dimensionals and DSP that retired about a million years ago.
Every year I make a special little something to hold a little something for the kids for Valentine's Day, and every year my boy gives his back.............after the candy is gone.
Several years ago I made my hubby a "Can O' Love" out of a Pringles can and decorated it with this paper. Everytime there is a special holiday or occasion I fill it with candy for him. He LOVES candy! So this is a "Can O' Love" for my boy. We'll see if he keeps this or not. I don't have my hopes up.
So there ya go! The cans I made for the girls are much more involved. But they keep the things I make them so I put a little more effort into it.
Alrighty then, time for bed.
Thanks so much for continuing to stop by and check up on me. I've disenfected things so many times I don't see how any germs are left and I hope to be back to a more regular blogging schedule. I miss you guys.
Blessings, b.
Monday, July 26, 2010
super star
Hey everyone! What a weekend we had! Go go go, busy busy busy. Then today, I had promised the girls we would go to the beach. So even though it was a relaxing day (except for the wonderful sunburn I brought home...........need to buy more sunscreen, I told the girls to use the rest) I got nothing done at home. I've got 234 emails in my box, 6 loads of laundry to do, piles of mail on my desk, etc........you get the idea.
That also means no stamping got done. So, I'm going to share the last scrapbook page I made for the Artisan entry.
I {heart} Hearts and Schoolbook Serif sets. Whisper white, brocade blue, crumb cake and basic black cardstock. Real red and Versamark inks. Sprial tab punch, black journaler, 2 way glue pen, dazzling diamonds glitter, 1 1/4" square punch, dimensionals.
Grace is so goofy. I'm not going to lie, this 12 x 12 page was a pain in the bazooka to put together. I guess I was running out of ink because the pics kept coming out with this blue tint. I had a heck of a time with the title too.
For the title, I ended up penciling a line and then used my stampamajig to keep them straight. I think the thing that was/is bugging me about this page is all the white space around the title. It seems naked or unfinished or something.
I stamped the letters and then used the 2 way glue pen to the word "star" and then added the glitter. Glitter is very camera shy around me and doesn't like to show off. I can't ever seem to get a good glitter pic.
Grace absolutely LOVES to have her picture taken. This day we had errands to run after school and she got ahold of my camera and had a ball! Gotta love them digital cameras!
I used the Sprial tab punch to make a film strip. Groovy huh? I used the rule of 3's and made 3 hearts and star goodies and placed them in a triangle on the page. The eye likes to look at things in odd numbers. The start has glitter on it too.
Alrighty then, I've eaten dinner, taken my Advil (sunburn) and getting ready to watch the Bachelorette. My Chris in still in there! I hope she picks him. I hope to get some stamping done tomorrow.
Thanks for stopping by and hanging out.
Blessings, b.
That also means no stamping got done. So, I'm going to share the last scrapbook page I made for the Artisan entry.
I {heart} Hearts and Schoolbook Serif sets. Whisper white, brocade blue, crumb cake and basic black cardstock. Real red and Versamark inks. Sprial tab punch, black journaler, 2 way glue pen, dazzling diamonds glitter, 1 1/4" square punch, dimensionals.
Grace is so goofy. I'm not going to lie, this 12 x 12 page was a pain in the bazooka to put together. I guess I was running out of ink because the pics kept coming out with this blue tint. I had a heck of a time with the title too.
For the title, I ended up penciling a line and then used my stampamajig to keep them straight. I think the thing that was/is bugging me about this page is all the white space around the title. It seems naked or unfinished or something.
I stamped the letters and then used the 2 way glue pen to the word "star" and then added the glitter. Glitter is very camera shy around me and doesn't like to show off. I can't ever seem to get a good glitter pic.
Grace absolutely LOVES to have her picture taken. This day we had errands to run after school and she got ahold of my camera and had a ball! Gotta love them digital cameras!
I used the Sprial tab punch to make a film strip. Groovy huh? I used the rule of 3's and made 3 hearts and star goodies and placed them in a triangle on the page. The eye likes to look at things in odd numbers. The start has glitter on it too.
Alrighty then, I've eaten dinner, taken my Advil (sunburn) and getting ready to watch the Bachelorette. My Chris in still in there! I hope she picks him. I hope to get some stamping done tomorrow.
Thanks for stopping by and hanging out.
Blessings, b.
Saturday, February 6, 2010
ahhhh......the weekend
I'm so glad its the weekend! How about you? It is raining and windy this morning and I'm loving sitting here listening to it. So relaxing.
Then I realized I haven't shown you what we made on Thursday night yet. I had so much fun Thursday. Those ladies just crack me up!
This is what I made my hostess:
I {heart} hearts set (Occasions Mini) and Vintage Labels set(SAB). Rose red ink. Pretty in pink and very vanilla cardstock. Candle, Scallop trim border punch (SAB), Real red satin ribbon (Occasions Mini), wide oval punch, regal rose wide grosgrain and natural hemp.
I almost forgot to take a pic of it. It was already wrapped and I didn't have time to unwrap and then rewrap so I took the pic of it wrapped. I love stamping on candles. I hadn't done it in so long. So easy too.
Let me know if you'd like to know how to do this and I'll see if I can work something up for you.
This is one of the cards we made.

Isn't this beautiful (if I do say so myself)? So simple but just has such a WOW factor. I think this was the favorite card of the night. Everyone was trying to think of what the flower looked like. Camillia was the favorite, but I think it looks like a gardenia too.

Okay, want to know how to make this flower?
I first saw this idea on Dawn McVey's blog and she got it from someone else's blog. I'll see if I can find the link. eta: Okay, I guess I'm not supposed to link to her blog because she promotes another stamp company. But she is still a genius and I love her stuff. Google her and you'll find her.
Anyway, these flowers are everywhere right now. They are so pretty and you can make them out of any paper. The possibilities are endless.

I just used SU!'s scallop circle punch. Punch out 6 scallops. You can punch out more or less depending on how full you want your flower.


Then stack them all together. Notice how my scallops aren't lined up with each other? You can if you want, but there is no need. I think it looks a little more natural if they aren't.

Now, take one layer at a time and scrunch the heck out of it. Get those aggressions out!

Oh no! The thumb is back! It could use a little moisturizer too by the looks of it.
Just keep scrunching away until you have a little ball of scrunched paper.

The bottom will be flat and thats a good thing.


One of the best things about it, you can mail it and not worry about your flower getting crushed. It may look even better! If thats possible.
Then I realized I haven't shown you what we made on Thursday night yet. I had so much fun Thursday. Those ladies just crack me up!
This is what I made my hostess:
I almost forgot to take a pic of it. It was already wrapped and I didn't have time to unwrap and then rewrap so I took the pic of it wrapped. I love stamping on candles. I hadn't done it in so long. So easy too.
Let me know if you'd like to know how to do this and I'll see if I can work something up for you.
This is one of the cards we made.
Well Scripted (Occasions Mini). Not quite navy and very vanilla cardstock. Not quite navy ink. Wide oval punch, kraft taffeta ribbon, Bella Bleu DSP, brads and dimensionals.
Isn't this beautiful (if I do say so myself)? So simple but just has such a WOW factor. I think this was the favorite card of the night. Everyone was trying to think of what the flower looked like. Camillia was the favorite, but I think it looks like a gardenia too.
Okay, want to know how to make this flower?
I first saw this idea on Dawn McVey's blog and she got it from someone else's blog. I'll see if I can find the link. eta: Okay, I guess I'm not supposed to link to her blog because she promotes another stamp company. But she is still a genius and I love her stuff. Google her and you'll find her.
Anyway, these flowers are everywhere right now. They are so pretty and you can make them out of any paper. The possibilities are endless.
I just used SU!'s scallop circle punch. Punch out 6 scallops. You can punch out more or less depending on how full you want your flower.
1,2,3,4,5,6.
Then stack them all together. Notice how my scallops aren't lined up with each other? You can if you want, but there is no need. I think it looks a little more natural if they aren't.
Now, take one layer at a time and scrunch the heck out of it. Get those aggressions out!
Oh no! The thumb is back! It could use a little moisturizer too by the looks of it.
Just keep scrunching away until you have a little ball of scrunched paper.
The bottom will be flat and thats a good thing.
Then loosen up the petals. You can make it as scrunchy as you like it.
How many times can I use some form of the word scrunch?
There ya go. A beautiful flower! I do leave the middle (first layer) of the flower pretty scrunched up so I don't see the brad. You like it?
One of the best things about it, you can mail it and not worry about your flower getting crushed. It may look even better! If thats possible.
I'll be back with the pics of the other cards we made. Those pics didn't turn out so great so I'm going to redo them.
Thanks for stopping by today and checking in. I love it when you do that.
Blessings, b.
Subscribe to:
Posts (Atom)