Hey there! I hope everyone in the midwest is staying safe in the crazy snow I see on the news. Crazy snow!
I finally downloaded the pictures off the camera. So I have a few things to show you.
Vintage Verses (SAB) set. Basic gray and Versamark inks. Sahara sand, whisper white and island indigo cardstock. Sycamore street DSP (SAB), beautiful butterflies die, big shot, linen thread, dotted ribbon punch, pool party button (SAB), polka dot embossing folder and dimensionals.
I needed some thank yous and had just gotten my SAB goodies. I'm loving this pattern on the Sycamore Street DSP.
I used my basic gray marker to ink up just the frame part of one of the stamps in the Vintage Verses set (SAB). I really liked how this card came out.
We had our stamp club meeting last week and I wanted to use this same card but I ran out of the Island Indigo cardstock. So I used another pattern in the Sycamore Street DSP and used Rich Razzleberry cardstock.
I used clear embossing powder on this one. It was just what it needed to make those words pop!
Alrighty then, thats all for tonight. I'm going to finish watching Survivor and go to bed. I've got more things to show you soon.
Thanks for stopping by.
Blessings, b.
Showing posts with label double ribbon punch. Show all posts
Wednesday, February 27, 2013
Wednesday, September 26, 2012
yellow bike
Hidey Ho!
Today I want to show you a card I made for 18. I wanted to make something that she would keep on display in her room. You know, as a little reminder of how much her momma loves her.........and misses her.
When I was messing around with the Moving Forward set a few weeks ago I had the idea of making her a card using the bike image.
Her bike is yellow.
Since I was hoping she would keep it on display I thought maybe it should use the colors in her room. Everything we bought for her to take was teal, yellow and gray.
Totally not my kind of colors. Ugh!
I struggled with it for a few days and then came upon a color challenge. And guess what the colors were? Yellow and gray! Well alrighty then.
This Fab Friday is a new challenge blog and I'm kinda digging it. I haven't done any challenges in so so long. Maybe I should start again.
Ready?
Moving Forward set. Basic gray, whisper white, and so saffron cardstock. Basic black, daffodil delight, gumball green, raspberry ripple and taken with teal (retired) markers. Brads, big shot, large paper doily die, polka dot embossing folder, dotted ribbon punch, neutrals patterned paper.
I took a liberty and made the bike Delightful Daffodil because it matches her bike better. I hope she likes it. I even refrained from writing a whole bunch of mushy stuff on the inside. That would be a sure guarantee that it wouldn't be on display. But I think a little bit of love from mom will be okay.
Alrighty then, thats it for today. Thanks so much for stopping by and hanging out with me.
Blessings, b.
Today I want to show you a card I made for 18. I wanted to make something that she would keep on display in her room. You know, as a little reminder of how much her momma loves her.........and misses her.
When I was messing around with the Moving Forward set a few weeks ago I had the idea of making her a card using the bike image.
Her bike is yellow.
Since I was hoping she would keep it on display I thought maybe it should use the colors in her room. Everything we bought for her to take was teal, yellow and gray.
Totally not my kind of colors. Ugh!
I struggled with it for a few days and then came upon a color challenge. And guess what the colors were? Yellow and gray! Well alrighty then.
This Fab Friday is a new challenge blog and I'm kinda digging it. I haven't done any challenges in so so long. Maybe I should start again.
Ready?
Moving Forward set. Basic gray, whisper white, and so saffron cardstock. Basic black, daffodil delight, gumball green, raspberry ripple and taken with teal (retired) markers. Brads, big shot, large paper doily die, polka dot embossing folder, dotted ribbon punch, neutrals patterned paper.
I took a liberty and made the bike Delightful Daffodil because it matches her bike better. I hope she likes it. I even refrained from writing a whole bunch of mushy stuff on the inside. That would be a sure guarantee that it wouldn't be on display. But I think a little bit of love from mom will be okay.
Alrighty then, thats it for today. Thanks so much for stopping by and hanging out with me.
Blessings, b.
Sunday, June 24, 2012
cajun butterfly the 2nd
Hidey Ho! How is everyone today? Did you have a good weekend? We've been busy busy busy. Did you happen to see the new movie Brave? Yeah, me neither. But I want to. I've always wanted red hair like that. Grace doesn't like going to the movies so I'll have to wait until it comes to the Redbox. Weird child, I know.
Anyhow, I was thinking of the title for this card today and it seemed like I had already used this title. So I went and checked and.........I did.
Instead of wracking my brain coming up with something else, I just made it "the 2nd".
Here we go:
Flourishes background (retired), A Word for You. Crumb cake, baja breeze, early espresso cardstock. Whisper white craft and black Stazon inks. Big shot, beautiful butterflies die, labels framelits, comfort cafe DSP, dotted ribbon punch, sticky pearls, linen thread, paper piecer, dimensionals and glue dots.
So you may be wondering where I got that shape for the blue part, (which looks like bashful blue but its not). Well, I took one of the label framelits and cut off the sides and top. Sorry no pic to show you, but you're smart, you can figure this out.
Otherwise a pretty simple card.
Then I used the same design and made these:
The only difference is I used the old Thank You Kindly set and used Newsprint DSP for the butterfly.
I may use these for 17's graduation thank yous. Not sure yet. I don't have her seal of approval.
Alrighty then, this has been a reaaallllllllly long day so I'm going to bed. I hope you sleep good.
Thanks so much for stopping by.
Blessings, b.
Anyhow, I was thinking of the title for this card today and it seemed like I had already used this title. So I went and checked and.........I did.
Instead of wracking my brain coming up with something else, I just made it "the 2nd".
Here we go:
Flourishes background (retired), A Word for You. Crumb cake, baja breeze, early espresso cardstock. Whisper white craft and black Stazon inks. Big shot, beautiful butterflies die, labels framelits, comfort cafe DSP, dotted ribbon punch, sticky pearls, linen thread, paper piecer, dimensionals and glue dots.
So you may be wondering where I got that shape for the blue part, (which looks like bashful blue but its not). Well, I took one of the label framelits and cut off the sides and top. Sorry no pic to show you, but you're smart, you can figure this out.
Otherwise a pretty simple card.
Then I used the same design and made these:
The only difference is I used the old Thank You Kindly set and used Newsprint DSP for the butterfly.
I may use these for 17's graduation thank yous. Not sure yet. I don't have her seal of approval.
Alrighty then, this has been a reaaallllllllly long day so I'm going to bed. I hope you sleep good.
Thanks so much for stopping by.
Blessings, b.
Friday, February 24, 2012
slowly but surely......
.........its taken me over a week to get this post together. And its not even all that exciting.
But I want to share with you anyway.
First things first, Valentine's Day.
Yep, it was 10 days ago and I'm just now getting around to showing you what I made. I am a magnet for distraction.
No stamps! Crumb cake, whisper white, real red, early espresso and melon mambo cardstock. Soft suede ink. Simple alpha die, big shot, label framelits, small heart punch, large paper doily die, double ribbon punch, cork sheets, lattice embossing folder, designer frames embossing folders, wide oval punch, wood sheets, bakers twine, hemp, forest lodge DSP (retired), and dimensionals.
Kid Valentine treats. I got these cute little paint cans in the $spot at Target. Love Target! They each held an entire bag of candy. I'm embarrassed to say it didn't take them too long to eat them all either.
I used the wood sheets with the Label Framelits (occasions mini). It cut with no problem at all. Niiiiice.
For the girls' tags I cut a label and then embossed it with the Designer Frames embossing folders. Then I took a dauber with the soft suede ink and daubed ink on the raised dots to give it a litttle definition.
I then used the lattice embossing folder and punched out some wide ovals. Super easy but looks involved.
Here are the tops. I cut down the large paper doily, (I love that thing!) to fit the lid. I left the boy's naked.
Fabulous Phrases and woodgrain. Crumb cake, real red and whisper white cardstock. Black Stazon and crumb cake inks. Wood sheets, bakers twine, sponging, red craft paint, paper towel tube, jewelry tag punch and dimensionals.
This is the card I made the for the Husband. 4.25 x 4.25. I love these wood sheets. They cut just like cardstock. I didn't have a heart stamp the right size or thickness so I made my own. Here is how I did the hearts:
I cut down the paper towel tube. Using a toilet paper one would delete the cutting down part. But you got that right?
I pinched it on the bottom and then pushed in the top. To keep the shape I used a rubberband.
I had to use our ancient mouse pad in order to get a good impression.
Stamp the background, put it all together and you get, this. I'm loving that cute little jewelry tag punch.
I popped up the wood sheet with dimensionals.
12 days ago we also went to Arizona to check out NAU. Very nice place. The food was good. 17 seemed to like it.
In a few weeks we are going to Oregon. Anybody in the Portland or Eugene or Ashland areas? We will be there a week looking at colleges and checking out the housing market. This is one of the states we are considering moving to. Is there anything we should see or do? I appreciate any and all ideas.
We also had our very last Father/Daughter dance. Sniff. We are having a whole bunch of "lasts" this year. Its all going too fast and I'm trying to soak it all in.
For some reason dad is out of focus. They took pics there so hopefully they were both in focus for those.
Alrighty then, thats all for now. Who Do You Think You Are? is on and I love that show. I'm going to be very crafty in the next few weeks so hopefully I'll have lots to show you.
Thanks so much for stopping by. You give me warm fuzzies.
Blessings, b.
But I want to share with you anyway.
First things first, Valentine's Day.
Yep, it was 10 days ago and I'm just now getting around to showing you what I made. I am a magnet for distraction.
No stamps! Crumb cake, whisper white, real red, early espresso and melon mambo cardstock. Soft suede ink. Simple alpha die, big shot, label framelits, small heart punch, large paper doily die, double ribbon punch, cork sheets, lattice embossing folder, designer frames embossing folders, wide oval punch, wood sheets, bakers twine, hemp, forest lodge DSP (retired), and dimensionals.
Kid Valentine treats. I got these cute little paint cans in the $spot at Target. Love Target! They each held an entire bag of candy. I'm embarrassed to say it didn't take them too long to eat them all either.
I used the wood sheets with the Label Framelits (occasions mini). It cut with no problem at all. Niiiiice.
For the girls' tags I cut a label and then embossed it with the Designer Frames embossing folders. Then I took a dauber with the soft suede ink and daubed ink on the raised dots to give it a litttle definition.
I then used the lattice embossing folder and punched out some wide ovals. Super easy but looks involved.
Here are the tops. I cut down the large paper doily, (I love that thing!) to fit the lid. I left the boy's naked.
Fabulous Phrases and woodgrain. Crumb cake, real red and whisper white cardstock. Black Stazon and crumb cake inks. Wood sheets, bakers twine, sponging, red craft paint, paper towel tube, jewelry tag punch and dimensionals.
This is the card I made the for the Husband. 4.25 x 4.25. I love these wood sheets. They cut just like cardstock. I didn't have a heart stamp the right size or thickness so I made my own. Here is how I did the hearts:
I cut down the paper towel tube. Using a toilet paper one would delete the cutting down part. But you got that right?
I pinched it on the bottom and then pushed in the top. To keep the shape I used a rubberband.
I had to use our ancient mouse pad in order to get a good impression.
Stamp the background, put it all together and you get, this. I'm loving that cute little jewelry tag punch.
I popped up the wood sheet with dimensionals.
In a few weeks we are going to Oregon. Anybody in the Portland or Eugene or Ashland areas? We will be there a week looking at colleges and checking out the housing market. This is one of the states we are considering moving to. Is there anything we should see or do? I appreciate any and all ideas.
We also had our very last Father/Daughter dance. Sniff. We are having a whole bunch of "lasts" this year. Its all going too fast and I'm trying to soak it all in.
For some reason dad is out of focus. They took pics there so hopefully they were both in focus for those.
Alrighty then, thats all for now. Who Do You Think You Are? is on and I love that show. I'm going to be very crafty in the next few weeks so hopefully I'll have lots to show you.
Thanks so much for stopping by. You give me warm fuzzies.
Blessings, b.
Monday, August 15, 2011
these hands
Hey!
I've got another losing Artisan Award project to show you. ( The Boy just read that sentence and said, "Well, thats being positive.")
Last year I really struggled with my scrap pages but this year, I love them. I think they each turned out great. I wish I still had them. I do have pics although the pictures are horrible. We actually unpacked the box to take them because I forgot to do it beforehand. So click on it to make it bigger to see the detail.
I {heart} Hearts and Wonderful Favorites. Crumb cake and very vanilla cardstock. Either Baja Breeze or Marina Mist (not sure which) and crumb cake inks. Dotted ribbon punch, Springtime Vintage DSP, clearlits rectangle die, big shot, neutrals buttons, hemp or linen thread, dimensionals, naturally serif alpha die, newsprint DSP, neutrals patterned paper pack.
I loved the idea of this page. We actually took pictures of my hands. I wanted pictures of my MIL hands but we were running out of time.
Looks like I really need to invest in some good moisturizer.
I think I'll do this page again but with her hands. I love looking at hands. If you think about it, they have such stories to tell. I would love to create a reminder of what her hands look like. I still remember what my mom's hands looked like, I wish I had a picture though.
This is a pretty self explanatory page but let me know if you have any questions.
In other news, I ordered a whole mess of Stampin' Up! goodies last week and they are on their way here! Super excited! Wait until you see the Holiday Mini Catalog! WOW! Lots of nifty stuff in there.
Alrighty then, 17 and I are going to watch last night's Next Food Network Star. I want Susie to win.
Thanks for stopping by and hanging out and checking in and looking around and well..........you know. I love when you stop by.
Blessings, b.
I've got another losing Artisan Award project to show you. ( The Boy just read that sentence and said, "Well, thats being positive.")
Last year I really struggled with my scrap pages but this year, I love them. I think they each turned out great. I wish I still had them. I do have pics although the pictures are horrible. We actually unpacked the box to take them because I forgot to do it beforehand. So click on it to make it bigger to see the detail.
I {heart} Hearts and Wonderful Favorites. Crumb cake and very vanilla cardstock. Either Baja Breeze or Marina Mist (not sure which) and crumb cake inks. Dotted ribbon punch, Springtime Vintage DSP, clearlits rectangle die, big shot, neutrals buttons, hemp or linen thread, dimensionals, naturally serif alpha die, newsprint DSP, neutrals patterned paper pack.
I loved the idea of this page. We actually took pictures of my hands. I wanted pictures of my MIL hands but we were running out of time.
Looks like I really need to invest in some good moisturizer.
I think I'll do this page again but with her hands. I love looking at hands. If you think about it, they have such stories to tell. I would love to create a reminder of what her hands look like. I still remember what my mom's hands looked like, I wish I had a picture though.
This is a pretty self explanatory page but let me know if you have any questions.
In other news, I ordered a whole mess of Stampin' Up! goodies last week and they are on their way here! Super excited! Wait until you see the Holiday Mini Catalog! WOW! Lots of nifty stuff in there.
Alrighty then, 17 and I are going to watch last night's Next Food Network Star. I want Susie to win.
Thanks for stopping by and hanging out and checking in and looking around and well..........you know. I love when you stop by.
Blessings, b.
Friday, July 15, 2011
back in the saddle again...........
I'm kinda, sorta, feeling like things are evening out somewhat. I don't know how long this feeling will last so we'll just ride it as long as we can.
I was putting things away today and realized that I never showed you 17's birthday card I made. Its so awesome how could I forget? Hmph....
Woodgrain background. Crumb cake, whisper white and POOL PARTY cardstock. Whisper white ink. White taffeta ribbon, 5/8" silver brad, scallop border punch, 1/2" circle punch, dazzling diamonds, 2 way glue pen, tissue paper, big shot, fun flowers die and a Scrabble piece.
I love it! This turned out to be 4.25 x 4.25. See that cool blue color? That is one of the new In Colors, Pool Party. It is almost the exact color of the sheets on her bed. HA!
You can't tell too much but, I used the 2 way glue pen to add glitter to the brad. Its really sparkly!
See the ribbon pull? This piece comes out and you write your message of love on it. Well, thats what I did anyway.
I had picked up an extra Scrabble game at a yard sale thinking it would be nice to keep in the trailer. BUT we discovered it was missing tiles. No problem, I'll make cards with them. You can see I changed the number using a fine point Sharpie. Its probably been done a million times but, I thought I was so clever.
I used the Fun Flowers die with tissue paper. I have no idea how many layers there are. With the tissue paper you can cut a ton of layers with one swipe of the Big Shot. Quick and easy!
The other day I also made some bag tags for my ladies' orders. I was inspired by a tag I saw in PaperCrafts magazine.
A word for You and Woodgrain background. Crumb cake, melon mambo, pretty in pink and LUCKY LIMEADE cardstock. Black Stazon and whisper white inks. Dotted ribbon punch, big shot, beautiful butterflies die, neutrals buttons, linen thread, 1/2" circle punch, 1/8" black taffeta ribbon and felt.
Aren't they cute? Check out that green huh? That is another new In Color, Lucky Limeade. It looks like Old Olive and Kiwi Kiss had a love child. Its a color I can see myself using a bunch of.
I sewed the button on the butterflies using a needle and the linen thread. These would make really cute hair clippies for Grace. I'll have to try that.
Alrighty then. I completed my veggie planting on Monday and I have a big garden post coming up for you. Grace has been my assistant and I need to go through all the pics.
Thanks for stopping by and hanging out. And thank you to everyone who has shown interest in buying the retired stamps. I'm so happy they are going to good homes.
Blessings, b.
I was putting things away today and realized that I never showed you 17's birthday card I made. Its so awesome how could I forget? Hmph....
Woodgrain background. Crumb cake, whisper white and POOL PARTY cardstock. Whisper white ink. White taffeta ribbon, 5/8" silver brad, scallop border punch, 1/2" circle punch, dazzling diamonds, 2 way glue pen, tissue paper, big shot, fun flowers die and a Scrabble piece.
I love it! This turned out to be 4.25 x 4.25. See that cool blue color? That is one of the new In Colors, Pool Party. It is almost the exact color of the sheets on her bed. HA!
You can't tell too much but, I used the 2 way glue pen to add glitter to the brad. Its really sparkly!
See the ribbon pull? This piece comes out and you write your message of love on it. Well, thats what I did anyway.
I had picked up an extra Scrabble game at a yard sale thinking it would be nice to keep in the trailer. BUT we discovered it was missing tiles. No problem, I'll make cards with them. You can see I changed the number using a fine point Sharpie. Its probably been done a million times but, I thought I was so clever.
I used the Fun Flowers die with tissue paper. I have no idea how many layers there are. With the tissue paper you can cut a ton of layers with one swipe of the Big Shot. Quick and easy!
The other day I also made some bag tags for my ladies' orders. I was inspired by a tag I saw in PaperCrafts magazine.
A word for You and Woodgrain background. Crumb cake, melon mambo, pretty in pink and LUCKY LIMEADE cardstock. Black Stazon and whisper white inks. Dotted ribbon punch, big shot, beautiful butterflies die, neutrals buttons, linen thread, 1/2" circle punch, 1/8" black taffeta ribbon and felt.
Aren't they cute? Check out that green huh? That is another new In Color, Lucky Limeade. It looks like Old Olive and Kiwi Kiss had a love child. Its a color I can see myself using a bunch of.
I sewed the button on the butterflies using a needle and the linen thread. These would make really cute hair clippies for Grace. I'll have to try that.
Alrighty then. I completed my veggie planting on Monday and I have a big garden post coming up for you. Grace has been my assistant and I need to go through all the pics.
Thanks for stopping by and hanging out. And thank you to everyone who has shown interest in buying the retired stamps. I'm so happy they are going to good homes.
Blessings, b.
Wednesday, July 6, 2011
Let me introduce...............
California's newest licensed driver..............................(drumroll please)
Robin!
(and the crowd goes wild!) I am so proud of her. She actually got her permit last July 21st. Her permit expires this July 21st. She didn't get much (any) driving done this school year because homework just kicked her butt.
So, since school has been out we've been practicing. In less than a month she has had 2 behind the wheel lessons and missed a week of driving when we were in Iowa and she still pulled it off. WooHoo!
Now I have to pay for more insurance ;(
Did everyone have a nice 4th of July? Even though it was hotter than you know where, we had a productive yet fun day.
My veggie boxes were completed. I even bought a few plants to go in them but as of yet haven't had a free morning to plant them. I'll be updating you when I get things going. I know you're waiting on the edge of your seat ;)
We also gave the dogs a bath and gave Codie a hair cut. Took me 3 days to complete that.......long story.
Most years we go to a local baseball game. This is the A division of the Padres baseball team. Its close to the house and its a really nice field. There are no bad seats. I love baseball.
Of course they have a big fireworks show afterwards. So fun!
Anyhow, I still haven't gone through all the Iowa pics. It seems everyday there has been something going on that takes my attention.
Tonight I'm supposed to be designing for a class tomorrow night. Nothing like waiting until the last minute, eh? I think I'm broken. All I've really done tonight is get 2 projects halfway done. I need 4. I know what the next 2 are going to be but am having the hardest time coming up with ideas. I think part of the problem is that I've seen the new catalog and have ideas for those things. Problem is, I don't have those things yet. Oy!
Lucky for me, I don't have to work tomorrow so I'll have time to finish everything. Maybe I'm just better under pressure. Here's hoping.
Okay, I can't leave you with no stampiness at all. Here are a few cards I made for some friends at work that I won't be working with next year.
Retired word set, sorry don't remember the name and Woodgrain background. Crumb cake, very vanilla, Not Quite navy and old olive cardstock. Crumb cake and early espresso inks. Neutrals buttons, hemp, cork sheets, Springtime Vintage DSP, dotted ribbon punch, fun flowers die, big shot and dimensionals.
Alrighty then, this old lady is going to bed. Hopefully I'll be bright eyed and bushy tailed in the morning and knock out the next 2 projects. KaPow!
Thanks so much for stopping by. I'll have more stampy goodness to show you after tomorrow.
Blessings, b.
Monday, May 2, 2011
fun flowers x 2
Monday already.
Who watched the wedding? I DID! Kate's dress was so pretty and she looked comfortable with what she was getting into. I mean she's had 9 years to think about it.
I loved the trees in the chapel.
I thought it was interesting that Will doesn't have to wear a ring. Hmm.......
I kept thinking Diana would be so proud.
I'm supposed to be stamping tonight. I have a class on Thursday and of course I'm not ready. I had an idea. I tried it. It didn't work. I give up for tonight.
Besides, Dancing with the Stars is on. Kirstie is my fave this time around. I know she won't win but she cracks me up. I also really like Ralph. He is such a nice guy!
Tonight I thought I'd show you a couple more cards I've made lately using the Fun Flowers Die. I know its not in the Summer Mini Catalog but you can still order it. At least until June 30. But, I think it will be in the next big catalog. I hope so anyway.
Woodgrain and So Happy for You (SAB). Crumb cake and early espresso inks. Not quite navy, Crumb cake and very vanilla cardstock. Springtime vintage DSP (occasions mini), Fun flowers die, big shot, neutrals buttons, hemp, crumb cake seam binding, sponges, cutter kit, corner rounder.
Okay, so the DSP and the words aren't available anymore. You can improvise right? I really liked this card.
Woodgrain and A Word for You sets. Crumb cake, not quite navy, pear pizzaz and very vanilla cardstock. Early espresso and crumb cake inks. Fun Flowers die, big shot, hemp, dotted ribbon punch, corner rounder.
Geez! Almost all the same colors. I'm telling you, I have an addiction to Crumb Cake.
Alrighty then, we start state testing tomorrow and I'm going to need extra rest. I get to do the 6th graders.
Thanks so much for stopping by.
Blessings, b.
Who watched the wedding? I DID! Kate's dress was so pretty and she looked comfortable with what she was getting into. I mean she's had 9 years to think about it.
I loved the trees in the chapel.
I thought it was interesting that Will doesn't have to wear a ring. Hmm.......
I kept thinking Diana would be so proud.
I'm supposed to be stamping tonight. I have a class on Thursday and of course I'm not ready. I had an idea. I tried it. It didn't work. I give up for tonight.
Besides, Dancing with the Stars is on. Kirstie is my fave this time around. I know she won't win but she cracks me up. I also really like Ralph. He is such a nice guy!
Tonight I thought I'd show you a couple more cards I've made lately using the Fun Flowers Die. I know its not in the Summer Mini Catalog but you can still order it. At least until June 30. But, I think it will be in the next big catalog. I hope so anyway.
Woodgrain and So Happy for You (SAB). Crumb cake and early espresso inks. Not quite navy, Crumb cake and very vanilla cardstock. Springtime vintage DSP (occasions mini), Fun flowers die, big shot, neutrals buttons, hemp, crumb cake seam binding, sponges, cutter kit, corner rounder.
Okay, so the DSP and the words aren't available anymore. You can improvise right? I really liked this card.
Woodgrain and A Word for You sets. Crumb cake, not quite navy, pear pizzaz and very vanilla cardstock. Early espresso and crumb cake inks. Fun Flowers die, big shot, hemp, dotted ribbon punch, corner rounder.
Geez! Almost all the same colors. I'm telling you, I have an addiction to Crumb Cake.
Alrighty then, we start state testing tomorrow and I'm going to need extra rest. I get to do the 6th graders.
Thanks so much for stopping by.
Blessings, b.
Sunday, April 10, 2011
copy cat
Hey there! I hope you had a nice weekend. We had a beautiful one! The weather is just how I like it. Low 60's and breezy with big puffy clouds. Perfect.
So I felt pretty darn good this weekend and got lots of stuff done. Taxes? Check Grocery shopping? Check Clean sheets? Check. Plus a million other things that I was supposed to get done while on vacation but didn't feel good enough to do.
Of course now that I feel better, I gotta go back to work tomorrow.
The children are just starting their vacation though. In fact the boy has jury duty tomorrow. Poor kid. He called today and he has to go in. I hope he gets to come home by lunch.
I know that I am overprotective and shelter my kids. But I just don't think at 18 you're ready to handle something like jury duty. I mean, thats kind of a heavy responsibility. A friend of mine just had to serve and the subject matter of that case was not something that I would want to deal with, much less wanting my kid to be exposed to.
Get over it, right? Yeah, I know.
So anyway, I was stamping on Thursday. I was hanging out in bloggie land and saw this card on Connie Collins' blog and copied it.
Well, mostly copied it.
I don't copy really. In fact, since January, I don't even check out many blogs or websites anymore. Lately I've been finding it harder to come up with my own ideas if I'm contstantly looking at other people's stuff.
BUT, with that being said, if you are really struggling with an idea or just aren't the type of person to design yourself, then copying is the best way to go. Especially since that can become a jumping off point for your own ideas.
A Word for You. Rose red, basic black and very vanilla cardstock. Black Stazon ink. Polka dot embossing folder, big shot, pear pizzaz seam binding, dotted scallop punch and vintage dsp.
Connie's was much cuter. This was a super quick and easy card though. Now that I look at it here in front of me, its much cuter in real life. You'll just have to come over and see. Maybe I'll cut down the vanilla square. I think I'll like that better.
But I'm not going to do it right now though because The Amazing Race just started. I hope my cowboys are doing good tonight. So, gotta go.
Thanks so much for stopping by.
Blessings, b.
So I felt pretty darn good this weekend and got lots of stuff done. Taxes? Check Grocery shopping? Check Clean sheets? Check. Plus a million other things that I was supposed to get done while on vacation but didn't feel good enough to do.
Of course now that I feel better, I gotta go back to work tomorrow.
The children are just starting their vacation though. In fact the boy has jury duty tomorrow. Poor kid. He called today and he has to go in. I hope he gets to come home by lunch.
I know that I am overprotective and shelter my kids. But I just don't think at 18 you're ready to handle something like jury duty. I mean, thats kind of a heavy responsibility. A friend of mine just had to serve and the subject matter of that case was not something that I would want to deal with, much less wanting my kid to be exposed to.
Get over it, right? Yeah, I know.
So anyway, I was stamping on Thursday. I was hanging out in bloggie land and saw this card on Connie Collins' blog and copied it.
Well, mostly copied it.
I don't copy really. In fact, since January, I don't even check out many blogs or websites anymore. Lately I've been finding it harder to come up with my own ideas if I'm contstantly looking at other people's stuff.
BUT, with that being said, if you are really struggling with an idea or just aren't the type of person to design yourself, then copying is the best way to go. Especially since that can become a jumping off point for your own ideas.
A Word for You. Rose red, basic black and very vanilla cardstock. Black Stazon ink. Polka dot embossing folder, big shot, pear pizzaz seam binding, dotted scallop punch and vintage dsp.
Connie's was much cuter. This was a super quick and easy card though. Now that I look at it here in front of me, its much cuter in real life. You'll just have to come over and see. Maybe I'll cut down the vanilla square. I think I'll like that better.
But I'm not going to do it right now though because The Amazing Race just started. I hope my cowboys are doing good tonight. So, gotta go.
Thanks so much for stopping by.
Blessings, b.
Sunday, January 30, 2011
mini picture book.......finally
Hidey Ho!
How is everyone doing? I got to stamp today and it felt so good! Its been a long time and I really missed it.
I finally got the other mini picture book done for my cousin and I took pics of the process for you in case you would like to make your own little book.
Here is what it ended up looking like:
Punch Potpourri (hostess set). Basic black, crumb cake, poppy parade and old olive cardstock. Poppy parade and soft suede inks. Big shot, little leaves die, sticky pearls, double ribbon punch, Newsprint DSP and a bunch of my favorite Tombow Multi glue.
Cute eh? This measures 3" x 3". Small enough to fit in your purse or pocket. Here are the step by steps for you:
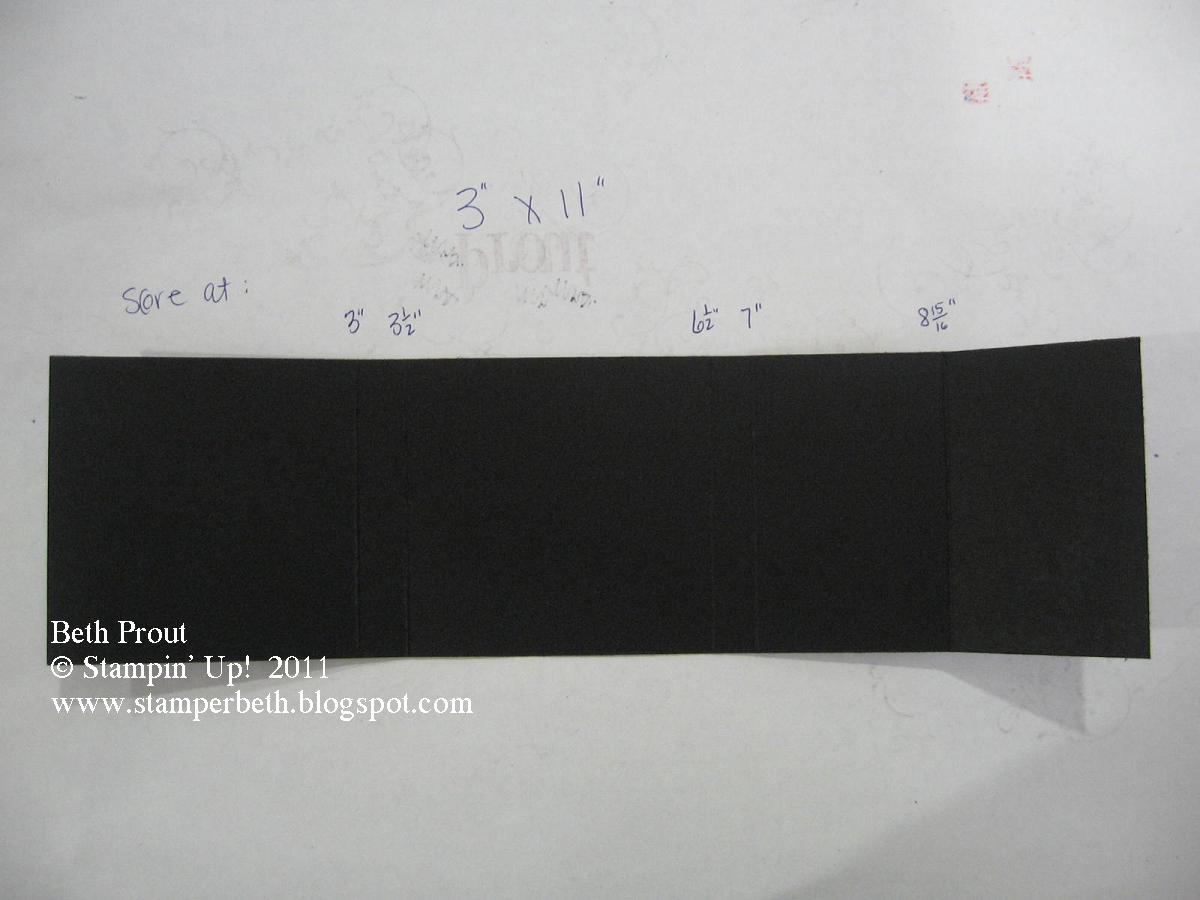
Start with your cover. This measures 3" x 11". Score at 3", 3 1/2", 6 1/2", 7", 8 15/16".
Now for your inside pages. Again, this measures at 3" x 11". Score at 3", 6", and 9". This will leave you a 2" little piece. I wanted 8 pages in mine and so cut 3 of these. You can have more or less depending on your need. Fold it mountain and valley style.
Put some glue on the 2" section and glue it to a 3" section. Do this for all 3 pieces so you have one long continuous piece.
Since I only wanted 8 pages, I cut off the last 3" and 2" sections. This will make sense in a minute......I think.
See what I've got going on here? Both of the 3" sections on either side will glue to the cover. Now if you didn't want pages or wanted to put pics on both sides of the panels then you could just glue one of the 3" sections to the cover and the rest would pull out like an accordion. Does that make sense?
Here I've only glue down the left 3" section of the crumb cake to the 3" section of the black. See how you could leave the right side unglued and it would fold out?
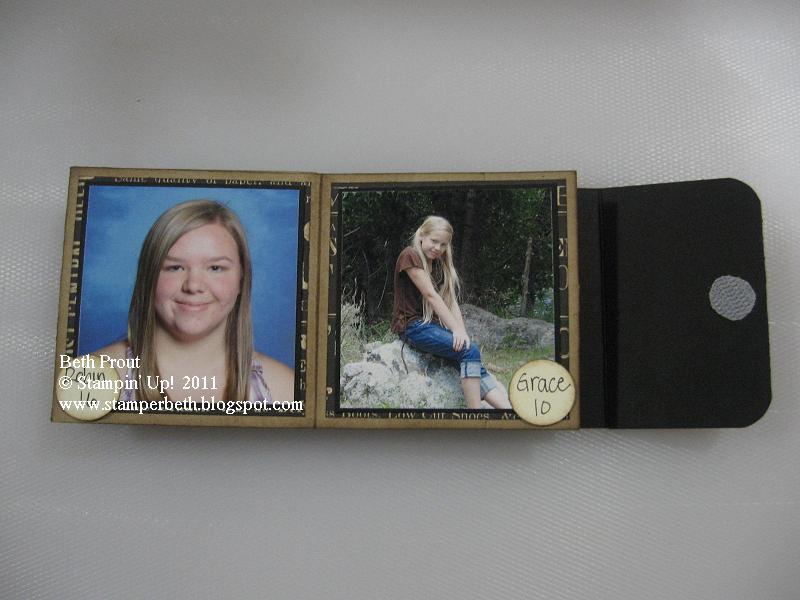
This is the other side of the cover. There are 2 sections. One should measure 1 15/16" and the other will measure 2 1/16". Stick some glue on there (get it? stick some glue? I crack myself up) and glue them together. This will make the flap of the book and will make it sturdier.
Here you see that I glued down the left 3" section to the cover and ran a stripe of glue down the inside crease of the pages. You don't want to glue the whole inside together because then it wouldn't fold flat for viewing.
Here is a little pearl of wisdom for you, it would be so wise to sponge your pages before you ever glued them in the book. Its a little more cumbersome after the fact. ;) I cut the Newsprint DSP into 2 3/4" squares and glued them in after I sponged the pages.
Now its time to glue in your pics. I printed mine out as wallet size and then cut them into squares.
I know, I jumped a little here didn't I? I covered the flap with some more DSP, then used the double ribbon punch, the little leaves die and cut out the flower. I just got the sticky pearls (really not my style, but I like it here). I glued down everything with the Tombow really well and tried to keep everything pretty flat. That way when she puts it in her purse or pocket the cover won't get messed up.
Oh yeah, I also rounded the corners of the flap.
Velcro.
I tried to punch it with my 3/4" circle punch but it wouldn't work. Anyway, this makes a nice tight closure.
Adding the black cardstock matting behind the pics makes these pages pretty sturdy. My sweet cousin has a 2 year old and hopefully she'll be able to look at this book and her baby strength won't annihilate it in 2 seconds.
There ya go! Cute little picture book. Now go forth a make a bunch! Let me know if you have any questions.
Thanks so much for stopping by. I know I've been pretty sporadic lately but things will get back to normal. More on that another day.
Blessings, b.
How is everyone doing? I got to stamp today and it felt so good! Its been a long time and I really missed it.
I finally got the other mini picture book done for my cousin and I took pics of the process for you in case you would like to make your own little book.
Here is what it ended up looking like:
Punch Potpourri (hostess set). Basic black, crumb cake, poppy parade and old olive cardstock. Poppy parade and soft suede inks. Big shot, little leaves die, sticky pearls, double ribbon punch, Newsprint DSP and a bunch of my favorite Tombow Multi glue.
Cute eh? This measures 3" x 3". Small enough to fit in your purse or pocket. Here are the step by steps for you:
Start with your cover. This measures 3" x 11". Score at 3", 3 1/2", 6 1/2", 7", 8 15/16".
Now for your inside pages. Again, this measures at 3" x 11". Score at 3", 6", and 9". This will leave you a 2" little piece. I wanted 8 pages in mine and so cut 3 of these. You can have more or less depending on your need. Fold it mountain and valley style.
Put some glue on the 2" section and glue it to a 3" section. Do this for all 3 pieces so you have one long continuous piece.
Since I only wanted 8 pages, I cut off the last 3" and 2" sections. This will make sense in a minute......I think.
See what I've got going on here? Both of the 3" sections on either side will glue to the cover. Now if you didn't want pages or wanted to put pics on both sides of the panels then you could just glue one of the 3" sections to the cover and the rest would pull out like an accordion. Does that make sense?
Here I've only glue down the left 3" section of the crumb cake to the 3" section of the black. See how you could leave the right side unglued and it would fold out?
This is the other side of the cover. There are 2 sections. One should measure 1 15/16" and the other will measure 2 1/16". Stick some glue on there (get it? stick some glue? I crack myself up) and glue them together. This will make the flap of the book and will make it sturdier.
Here you see that I glued down the left 3" section to the cover and ran a stripe of glue down the inside crease of the pages. You don't want to glue the whole inside together because then it wouldn't fold flat for viewing.
Here is a little pearl of wisdom for you, it would be so wise to sponge your pages before you ever glued them in the book. Its a little more cumbersome after the fact. ;) I cut the Newsprint DSP into 2 3/4" squares and glued them in after I sponged the pages.
Now its time to glue in your pics. I printed mine out as wallet size and then cut them into squares.
I know, I jumped a little here didn't I? I covered the flap with some more DSP, then used the double ribbon punch, the little leaves die and cut out the flower. I just got the sticky pearls (really not my style, but I like it here). I glued down everything with the Tombow really well and tried to keep everything pretty flat. That way when she puts it in her purse or pocket the cover won't get messed up.
Oh yeah, I also rounded the corners of the flap.
Velcro.
I tried to punch it with my 3/4" circle punch but it wouldn't work. Anyway, this makes a nice tight closure.
Adding the black cardstock matting behind the pics makes these pages pretty sturdy. My sweet cousin has a 2 year old and hopefully she'll be able to look at this book and her baby strength won't annihilate it in 2 seconds.
There ya go! Cute little picture book. Now go forth a make a bunch! Let me know if you have any questions.
Thanks so much for stopping by. I know I've been pretty sporadic lately but things will get back to normal. More on that another day.
Blessings, b.
Subscribe to:
Posts (Atom)