Showing posts with label wonderful favorite. Show all posts

Monday, August 15, 2011

these hands

Hey!

I've got another losing Artisan Award project to show you.  ( The Boy just read that sentence and said, "Well, thats being positive.") 

Last year I really struggled with my scrap pages but this year, I love them.  I think they each turned out great.  I wish I still had them.  I do have pics although the pictures are horrible.  We actually unpacked the box to take them because I forgot to do it beforehand.  So click on it to make it bigger to see the detail. 


I {heart} Hearts and Wonderful Favorites.  Crumb cake and very vanilla cardstock.  Either Baja Breeze or Marina Mist (not sure which) and crumb cake inks.  Dotted ribbon punch, Springtime Vintage DSP, clearlits rectangle die, big shot, neutrals buttons, hemp or linen thread, dimensionals, naturally serif alpha die, newsprint DSP, neutrals patterned paper pack.

I loved the idea of this page.  We actually took pictures of my hands.  I wanted pictures of my MIL hands but we were running out of time.

Looks like I really need to invest in some good moisturizer. 

I think I'll do this page again but with her hands.  I love looking at hands.  If you think about it, they have such stories to tell.  I would love to create a reminder of what her hands look like.  I still remember what my mom's hands looked like, I wish I had a picture though. 

This is a pretty self explanatory page but let me know if you have any questions. 

In other news, I ordered a whole mess of Stampin' Up! goodies last week and they are on their way here!  Super excited!   Wait until you see the Holiday Mini Catalog!  WOW!  Lots of nifty stuff in there. 

Alrighty then, 17 and I are going to watch last night's Next Food Network Star.  I want Susie to win. 

Thanks for stopping by and hanging out and checking in and looking around and well..........you know.  I love when you stop by. 

Blessings, b.

Monday, June 6, 2011

Mother's Day?

Hidey Ho!  How is everyone today?  We had beautiful weather today.  I hope you did too. 

I still have lots to do tonight so I'm going to be short and sweet.  HA! 

I'm going to try anyway. 

I did a little desk cleaning this weeekend.  I need to organize things a little better with what I got.  But I'll have to wait until school is out to do a really good job of it. 

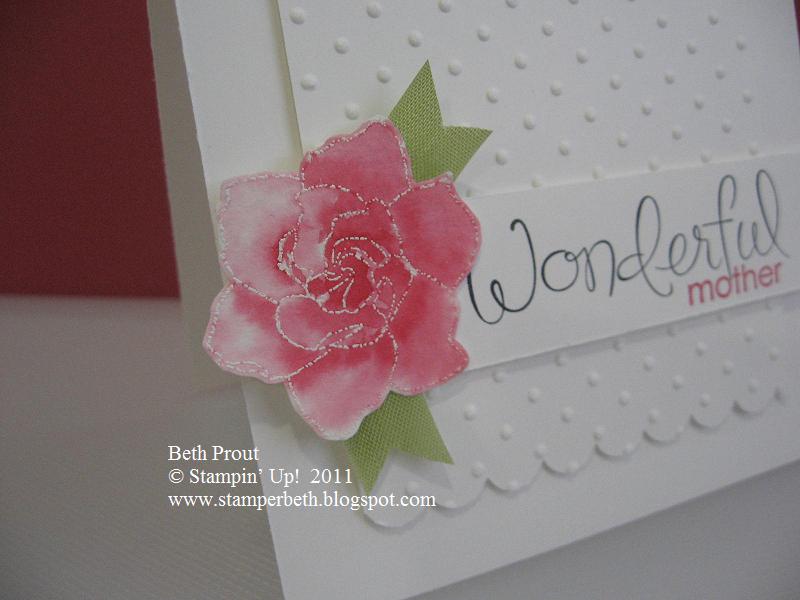
Anyhow, I found a Mother's Day card that I never showed you.  Its reel purty.


Growing Green and Wonderful Favorites (retiring).  Whisper white and watercolor cardstock.  Rose red and Black Stazon inks.  Polka dot embossing folder, big shot, scallop border punch, pear pizzaz seam binding, aquapainter and dimensionals.

Neat huh?  I really like it.  Now, I did actually send one of these to my MIL.  She loved it.  I just made an extra to keep around for me.  You could just change the wording and PRESTO CHANGO! you've got a great card. 


I popped the center panel up on dimensionals. 


I colored the flower using that Floating Reinker technique some genius made up.  Wasn't me!  Here is how you do it;

Using watercolor paper, stamp your image and emboss.  My white embossing powder is kinda suckish.  Does it get old?  It looks like I need a fresh jar. 

Anyhow, emboss the image and then water it down with your aquapainter. 

Then pick up some color, I smashed my ink pad lid to get a little ink on there.  Don't worry about blending (I'm not good at blending anyway) and let the color bleed where it wants. 

Lay down more color in certain areas to get some shading.  Then just let dry. 

Easy.

Alrighty then, I told you, short and sweet.  Oh yeah, did I mention, I GOT NEW CATALOGS TODAY!  I have swept through it fairly quickly and I love it!  It seems better organized.  I have a big wish list and I didn't even go through it real carefully.  You're gonna love it too!  Let me know if you want one. 

Thanks for stopping by and checking in and hanging around and looking and well, everything else you do here.

Blessings, b.

Wednesday, April 27, 2011

back to normal around here

Hey everyone!  I'm happy that everyone's vacations are over and we are all back on schedule around here. 

It would have been great if our vacations had been at the same time.  But as soon as I went back to work, the kids had off.  Bummer! 

So how was Easter?  We had a quiet one here.  The boy got his wisdom teeth out on Good Friday and he was not good company. 

Grace made some awesome Easter cards this year.  She was bored on vacation while mom was at work.  Check this kid out:


This was all her doing.  I came home from work and this was on my desk.  This kid rocks!  Look at the detail:


She loves to stamp.  When I have a class at our house, all the other family members disappear.  Not Grace.  She is right in there helping out.  So funny.  This card went to gramma and grandpa.

Look what she made us for Easter morning:


We each got our own card in our favorite colors.  Can you guess which one is mine?  I'll give you a hint:  it starts with crumb and ends with cake.

I have a little box with leftover letters from the Naturally Serif Alpha die cut and she went through there and picked out letters.  She said the words were in the shape of the cross.  Clever girl!  This was another thing she just did on her own.  I don't know where she gets these ideas.  Love that girl!


Mother's Day is coming up you know.  Are you ready?  Me neither.

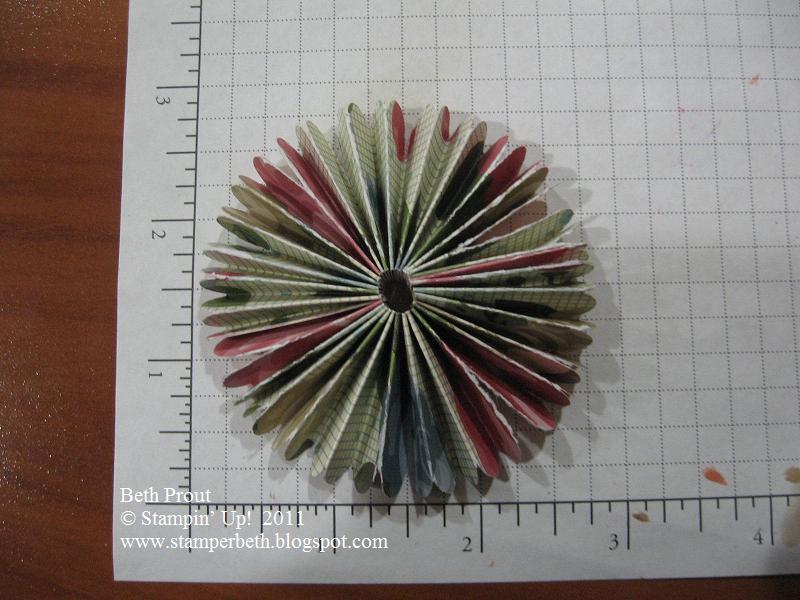
The other day I had a friend ask me how to make a circle fan and rather than try to explain it to her, I decided to do a picture tutorial.  It was the perfect opportunity to make a Mother's Day card.

How to make a circle fan:


First decide how big you want your circle to be.  Then cut 2 pieces of DSP a little more than half that size.  So, if you want a 4" circle then cut your strips at 2 1/4" x 12.  I cut mine at 1 1/2" x 12".  I didn't need that big of a circle fan. 


For this fan I decided to use my scallop border punch on the edges before I scored them


For this strip I scored it between each scallop.  Can you see the score lines?  Which came out to every 3/8".  Usually when I make a circle fan, I'll score it every 1/4".  It won't be as bulky if you were mailing it. 


Then using my super duper Tombow Multi glue, glue 2 ends together.  You can use tape.  I just like the glue.


Make sure you match up the folds when you glue/tape it. 


Then glue the other ends together and you'll end up with this funky circle.  This is when you would punch out a circle of cardstock.  I punched a 1 3/8" circle but didn't get a pic of it.  Put tape over the whole surface of the punched circle.  Set it aside. 

I also forgot to take a pic of me pushing this circle flat and then gathering it up to get this:


Once you have this, carefully pick it up and put it on top of your sticky punched circle.  Press it down without squashing it. 


Here is what the backside looks like.  It doesn't matter if the circle is centered on the back.  No one will see it. 


I cut my strips 1 1/2" x 12" and it made a 2 3/4" circle fan. 

Now, I don't like this particular pattern of DSP so I made another circle fan out of cardstock. 

Lesson learned:
Making the gathered up cardstock circle stick to the sticky punched circle was next to impossible.  The cardstock is so much stronger than the DSP.  Lighter weight paper works better. 

But of course I couldn't let it go and made it work.  What did I use to strong arm it?  Tombow Multi Glue.  Love that stuff!


I {heart} hearts and Wonderful Favorites stamps.  Very vanilla, old olive and crumb cake cardstock.  Pretty in pink and rose red inks.  Vanilla seam binding, little leaves die, big shot, polka dot embossing folder, cutter kit, Springtime Vintage DSP, scallop border punch. 

I don't love this card.  Its okay.  Not sure I'll send it to her. 

Here's another example of me being a dork.  I had made the edges scalloped like on the DSP one but, when I flattened it and gathered it, I put the scallops on the inside of the circle.  DUH! 


I used the Cutter Kit to rough up the edges of the little circle.  This heart stamp actually says "friend" in the middle.  I covered it.


This one was also scored at 3/8" and you can see how much it sticks out.  Scoring at 1/4" would make it lie a little flatter. 

So there ya go.  Thats how you make a circle fan.  If you decide to try it, show me.  I would love to see your creations. 

Alrighty then, like I said, we are back on normal schedule here.  I have lots to show you and should have more regular posting going on.  Thanks so much for keeping the blog warm while I've been busy. 

Blessings, b.

Thursday, July 15, 2010

wonderful concrete

Hidey-Ho!

Concrete is done!  Woo Hoo!


Had a few of the boy's friends over to help. 


Getting closer!


Footing for the retaining wall.  I'm so excited for that to get finished!   Yes, that is one of my zucchini plants dying.  I don't know why.  I'll have to plant another one. 


The Great Wall of China!  It will be nice when it is all done.  So nice!  I'm so glad it over.......for now.  We still have to finish the wall. 


Okay, want to see another Artisan Award contender?  Good, because I'm going to show you.


Wonderful Favorites set.  Whisper white, soft suede, old olive and melon mambo cardstock.  Soft suede and melon mambo inks.  Little leaves die, big shot, curly label punch, Bella Bleu DSP, sponging and paper piercer.


Remember those wrinkly roses I was showing you a few days ago?  This was one of the 3D entries.  A few years ago Target had these little 4x4 frames in their Dollar Spot.  I took some sandpaper and sanded it down to look worn. 


These roses I cut in a wider spiral so they would stand up more.  Click on the link up there to see what I'm talking about.  I also crumpled up the old olive before I cut out the leaves. 


You can see how far out the roses are from the frame.  I stuck everything on with the Tombow Multi Glue.  Love that stuff!  I really like this frame.  I need to make another for me because I had to send this one into SU! 

Okay, bedtime.  Let me know if you have any questions about this project. 

Thanks for stopping by.  You make my heart swell.....in a good way.

Blessings, b.

Saturday, July 10, 2010

15 is now 16

Hey everyone!  Sorry for the absence.  We have been super duper busy around here and by the time 9:00 hits, I'm ready for bed. 

We have been crazy busy getting ready for concrete.  I'll be glad when thats done. 

And the big news:  15 had a birthday! 

I can't believe she is 16 already.  Time just flies by doesn't it?  I took her and a few of her friends ice skating.  I opted not to skate this time.  My knee still isn't quite right from the last time I went.  Old lady here.

She doesn't like people to pay much attention to her so she wouldn't let me give her a big party.  And its nearly impossible to take a pic of her.  So I told her I wouldn't put her pic on here.  But, here is a pic of the card I made:


Wonderful Favorite and Letterpress numbers (retired). Pacific point, tempting turquoise, pear pizzazz and whisper white cardstock.  Pacific point and tempting turquoise inks.  1/2", 3/4" and 1" circle punches, corner rounder, turquoise grosgrain (retired), polka dot embossing folder, tombow multi glue and dazzling diamonds glitter. 


A few months ago we got her a new set of sheets and comforter for her bed.  It is a circle pattern with blues and greens on it.   So I thought I'd use that for inspiration for this card. 

I did some faux dry embossing on it.  I punched out some circles of the same color cardstock as the base and just glued them on.  Looks like dry embossing! 

See that green?  That is a new In Color, Pear Pizzazz. 


This circley/badgy/blue ribbon looking thing is really easy to make.  I had the idea of making her a badge/ ribbon type thing that said, "Its my birthday" for her to wear ice skating, but she said she would never, no way, no how, absolutely not, ever going to wear something like that.  So, I made one for her card. 

Here is how you make it.  Take a 1" strip of cardstock, mine was 11" long, and score it every 1/4".  Then glue the ends together.  Punch out a 1" circle and cover it with sticky strip.  Then coerce your accordian into this shape and press it into the sticky strip.  Its easier than it sounds.  Try it. 

I put some glitter on there for good measure. 


It does stick out quite a bit and if you were to mail something like this, I would use a padded envelope. 

Alrighty then, thats it for tonight.  I've been working on a big project that I'll show you in a few days.  Its not quite done yet.  I hope to get it finished tomorrow. 

Thanks for stopping by and being patient.  You guys are the best. 

Blessings, b.