Happy Saturday! I had kind of a lazy day today. I had every good intention but I fell off the path somewhere along the way. Tomorrow will be different.
Today I wanted to show you the bag tags I made for my club ladies. There are LOTS of pics so grab a drink and maybe even a snack. I'll wait..................
Ready?
Teeny tiny wishes and distressed dots background. Crumb cake, blush blossom, pretty in pink and black Stazon inks. Crumb cake, cajun craze, whisper white, gumball green, wild wasabi and basic black cardstock. Curly label punch, 1 3/4" scallop punch, owl builder punch, bitty butterfly punch, word window punch1 3/8" circle punch, big shot, label framelits, rhinestones and sunshine and sprinkles DSP.
Thats alot of supplies there. Whew! Now that I look at the little guy, his eyes are a little wonky. I guess he had too much green beer.
So I've put together a picture tutorial on how to make him. Its pretty self explanatory but heck, I've got nowhere to go.
Lets do this!
I didn't have any Blush Blossom cardstock. This color was retired a loooooong time ago but, you can still buy the marker in this color.
So since I didn't have any cardstock, I decided to make my own.
Take some white cardstock.......
..................and just rub your ink pad over it until you have the right depth of color you want.
Rocket science huh?
And then, I didn't take a pic of this but punch out a circle with your 1 3/8" circle punch.
I used my 1 3/4" scallop punch to get this. I lopped off the top but you don't really need to.
Stick your blush blossom circle on there. Note: I had decided I didn't have enough Blush Blossom ink on there so I made some more paper and punched a new circle later.
Now for the hat. Cut a gumball green curly label in half on the long side, so the short sides are intact.
I just freehanded a strip of black cardstock and glued it on. Trim it to fit. You'll also notice I punched some gumball green with the word window punch.
Then put them together.
Now get out your owl punch and punch out 4 cute little hearts. This is wild wasabi. I love this owl punch although I will admit, I never make owls with it.
Now get your magnifiers on because you're old and can't see up close anymore and put a drop of glue on your hat. This was not enough and I had to add more..........just so you know. Place the hearts on the glue to form a shamrock.
When we started selling the rhinestones, I bought a whole pack of colored Sharpies just for this. So color a rhinestone yellow and stick it in the middle of your shamrock. I just wanted the idea of gold represented somewhere on my little guy.
Stick the hat your head.
Once again, use your owl punch to make some eyes. Did you know you can just press the tip of your paper snips on the dot and it will pick it up? Yep, works great. Use your white gel pen to add some character.
Add some pretty in pink cheeks. I did this before I decided he needed a mustache. Don't forget to punch out some ears too. I just used the owl punch again.
I had bought this Bitty Butterfly punch from the Spring Catalog in Jan. and I've never used it. I think it makes the perfect bushy mustache. I'm just showing you how I cut it apart here.
I don't have the Two Tags die so I rigged up my own. This was a 2 1/4" x 4" strip of crumb cake. Roll it through the machine only half way and then roll it back out. Just so it cuts the top.
Nifty huh?
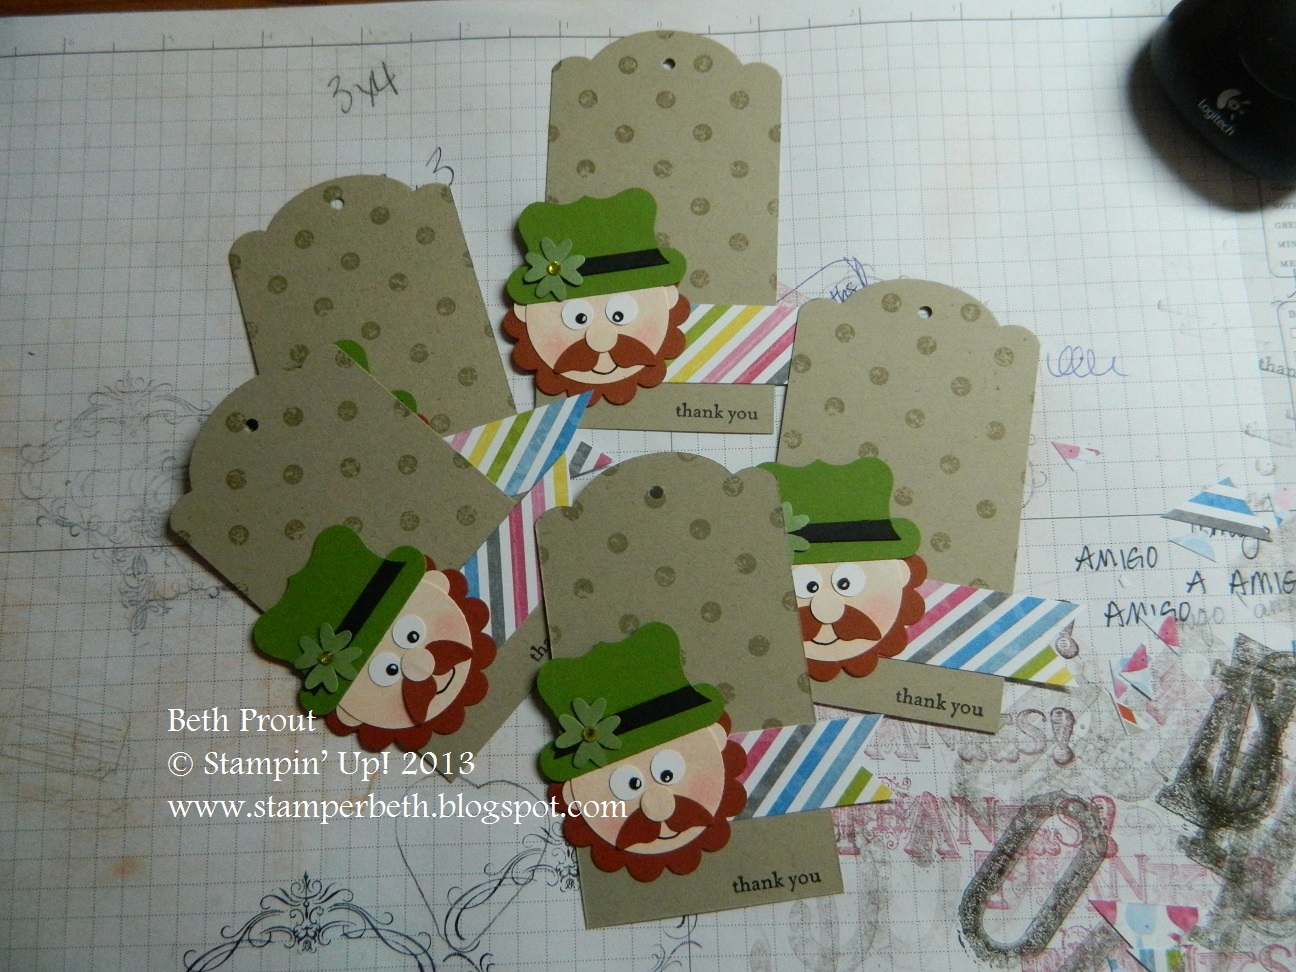
Here they are all together. Sorry about the dirty background paper. Geez...what a slob!
I used the Sunshine and Sprinkles DSP from the Spring Catalog for the strip because it makes me think of rainbows. Right after I had gotten them done and had handed out a few of the bags, I realized they would have been cuter on either a white or blue tag with white polka dots. But I decided I wasn't going to redo them. They are still cute.
Alrighty then. I'm heading to bed. I want to be bright-eyed and bushy-tailed for everything I need to do tomorrow.
Thanks so much for stopping by. I love that you do that.
Blessings, b.
Showing posts with label curly label punch. Show all posts
Saturday, March 9, 2013
Wednesday, July 27, 2011
home for good this time
Howdy. We are back home. Home at least until Thanksgiving...........or Christmas. I'm so glad to be home. I like home.
I have a ton of pics, of course. But tonight I want to finish showing you the projects I made with my card ladies a few weeks ago. Then I can get into all the other stuff. Okay? Okay.
Inspired by Nature and Elements of Style. Naturals white, daffodil delight, old olive, crumb cake and CALYPSO CORAL (new In Color) cardstock. Versamark, early espresso and old olive inks. Big shot, beautiful butterflies die, linen thread, paper piercer, cutter kit, wide oval punch, lunch bag and glue dots.
The ladies were getting a little tired of making cards all the time so I tried to switch things up and we made a bag!
Just keeping it fresh you know ;)
I used the In Color, Calypso Coral. I will admit that I don't much like this color. Not sure why. I had bought the Color Coach add ons and one of the color combos they suggested was Calypso Coral, Daffodil Delight and Baja Breeze.
Now I tried putting those colors together and they just screamed Miami Beach to me. That kind of art deco pastel thing going on. Really not my style.
BUT, my job as a demo is not neccessarily to only do things I like. Although that makes it much easier. I have to step out of my comfort zone once in awhile.
So I cut up a bunch of butterflies in all three colors and let them choose which and how many they wanted for their bag.
I layered the butterfiles and stamped the top ones using the Elements of Style swirly in Versamark. I don't have the Calypso Coral ink yet so using Versamark is the best idea until I do.
This is a super easy and cheap idea for giving gifts. Just cut down your lunch bag to the desired height. I cut mine to 5.5". Add some cardstock to the front and back and decorate. WaLa! Instant prettiness.
So keeping in the bag/box idea, we also made a 2,4,6,8 box. Remember those? Love them!
Wonderful Favorites (retired). Island Indigo, rich razzleberry, baja breeze, whisper white and old olive cardstock. Early Espresso ink. Curly label punch, blossom bouquet triple layer punch, early espresso bakers twine, big shot, little leaves die, brads, dimensionals, scallop border punch and 1/2" circle punch.
A nice simple little box. Here is how you make it: sorry no pics
Take a piece of 8.5 x 11 cardstock and cut it in half. So you have a 5.5 x 8.5 piece.
Then put it in your trimmer lengthwise and use your scoring blade to score a line at 2".
Then turn it widthwise and score at 2", 4", 6", and 8".
Cut off the little 2 x .5 piece. Then just fold up and glue. Easy.
Let me know if you need more help with that.
Otherwise I'm sure you can figure out the punched peices. If you use the Tombow Multi Glue this will be a very sturdy box. It will fit a regular size gift card nicely.
Alrighty then. Since coming home I've been trying to catch up on everything. We brought a bunch of stuff home from my dad's house. I don't have anywhere to put this stuff!
Plus I'm going through pics of our trip. I know you can't wait to see ;).
AND convention is over and I've been spending too much time on the computer looking at display board pics. I did enter the Artisan Award contest again this year and didn't win. I guess I didn't make the finalists list either because nobody emailed me to let me know. Oh well. Maybe I'll try again next year. I'll be showing you those projects soon.
Oh, I almost forgot, Ali Edwards is doing her yearly Week in the Life project this week. I had planned on doing it but with getting home a little later than expected and then getting a migraine and feeling overwhelmed for a day or so, I had forgotten about it. I remembered this morning and was going to just say, "forget it. I'll do it later" I decided to just go ahead and start today. The procrastinator in me just said, "WHAT?!"
I really love this project and will show you what I have so far tomorrow. Why don't you do it with me? Just pick up your camera and start shooting. Today I shot:
What I had for breakfast, going to the grocery store, going to the bank, playing darts, the hubs working, the cat, etc. Just whatever your life is about today. No stress, just document what you can.
This was supposed to be a quick post. HA! See what happens when I don't talk to you in so long? I get backup.
Thanks so much for stopping by. I love that you do.
Blessings, b.
I have a ton of pics, of course. But tonight I want to finish showing you the projects I made with my card ladies a few weeks ago. Then I can get into all the other stuff. Okay? Okay.
Inspired by Nature and Elements of Style. Naturals white, daffodil delight, old olive, crumb cake and CALYPSO CORAL (new In Color) cardstock. Versamark, early espresso and old olive inks. Big shot, beautiful butterflies die, linen thread, paper piercer, cutter kit, wide oval punch, lunch bag and glue dots.
The ladies were getting a little tired of making cards all the time so I tried to switch things up and we made a bag!
Just keeping it fresh you know ;)
I used the In Color, Calypso Coral. I will admit that I don't much like this color. Not sure why. I had bought the Color Coach add ons and one of the color combos they suggested was Calypso Coral, Daffodil Delight and Baja Breeze.
Now I tried putting those colors together and they just screamed Miami Beach to me. That kind of art deco pastel thing going on. Really not my style.
BUT, my job as a demo is not neccessarily to only do things I like. Although that makes it much easier. I have to step out of my comfort zone once in awhile.
So I cut up a bunch of butterflies in all three colors and let them choose which and how many they wanted for their bag.
I layered the butterfiles and stamped the top ones using the Elements of Style swirly in Versamark. I don't have the Calypso Coral ink yet so using Versamark is the best idea until I do.
This is a super easy and cheap idea for giving gifts. Just cut down your lunch bag to the desired height. I cut mine to 5.5". Add some cardstock to the front and back and decorate. WaLa! Instant prettiness.
So keeping in the bag/box idea, we also made a 2,4,6,8 box. Remember those? Love them!
Wonderful Favorites (retired). Island Indigo, rich razzleberry, baja breeze, whisper white and old olive cardstock. Early Espresso ink. Curly label punch, blossom bouquet triple layer punch, early espresso bakers twine, big shot, little leaves die, brads, dimensionals, scallop border punch and 1/2" circle punch.
A nice simple little box. Here is how you make it: sorry no pics
Take a piece of 8.5 x 11 cardstock and cut it in half. So you have a 5.5 x 8.5 piece.
Then put it in your trimmer lengthwise and use your scoring blade to score a line at 2".
Then turn it widthwise and score at 2", 4", 6", and 8".
Cut off the little 2 x .5 piece. Then just fold up and glue. Easy.
Let me know if you need more help with that.
Otherwise I'm sure you can figure out the punched peices. If you use the Tombow Multi Glue this will be a very sturdy box. It will fit a regular size gift card nicely.
Alrighty then. Since coming home I've been trying to catch up on everything. We brought a bunch of stuff home from my dad's house. I don't have anywhere to put this stuff!
Plus I'm going through pics of our trip. I know you can't wait to see ;).
AND convention is over and I've been spending too much time on the computer looking at display board pics. I did enter the Artisan Award contest again this year and didn't win. I guess I didn't make the finalists list either because nobody emailed me to let me know. Oh well. Maybe I'll try again next year. I'll be showing you those projects soon.
Oh, I almost forgot, Ali Edwards is doing her yearly Week in the Life project this week. I had planned on doing it but with getting home a little later than expected and then getting a migraine and feeling overwhelmed for a day or so, I had forgotten about it. I remembered this morning and was going to just say, "forget it. I'll do it later" I decided to just go ahead and start today. The procrastinator in me just said, "WHAT?!"
I really love this project and will show you what I have so far tomorrow. Why don't you do it with me? Just pick up your camera and start shooting. Today I shot:
What I had for breakfast, going to the grocery store, going to the bank, playing darts, the hubs working, the cat, etc. Just whatever your life is about today. No stress, just document what you can.
This was supposed to be a quick post. HA! See what happens when I don't talk to you in so long? I get backup.
Thanks so much for stopping by. I love that you do.
Blessings, b.
Friday, November 19, 2010
band on the brain
Howdy stampers!
Ahh.......the week is over. For the past few months my dear hubby has been planning and organizing a band tournament. Wednesday was the day. Our school hosted 14 bands.
This was a huge undertaking. So many details to consider that I never would have thought of. I helped mostly with the program. And the judges gifts. And crowd control. That was my favorite. I had the power to deny access to the stands during performances. Sometimes having the power is fun. I am woman! Hear me roar! HAHAHA!
I have pics to share with you. Of course the judges gifts included some stamping. My hubby didn't see the reason for this. He never does........
Ahh.......the week is over. For the past few months my dear hubby has been planning and organizing a band tournament. Wednesday was the day. Our school hosted 14 bands.
This was a huge undertaking. So many details to consider that I never would have thought of. I helped mostly with the program. And the judges gifts. And crowd control. That was my favorite. I had the power to deny access to the stands during performances. Sometimes having the power is fun. I am woman! Hear me roar! HAHAHA!
I have pics to share with you. Of course the judges gifts included some stamping. My hubby didn't see the reason for this. He never does........
I had to put together 8 gifts. The first thing was deciding what the packaging was going to be. We went through several different options. Trying to stay on the cheap side but make them nice. Story of my life.......
I found boxes at Michael's for .89 a piece. They were 9"x4". I cut a rectangle in the top and adhered a transparency so you could see through them. I tied them up with our real red striped grosgrain ribbon.
Cute eh? Each box had a coffee cup, Starbucks Via coffee, creamers, sugars, fancy hot chocolate, candies, Oreo mini cookies, popcorn, 2 different kinds of tea bags and of course, a set of 3 note cards, lovingly handstamped by me. I'll show you those in a minute. First check out the tag:
A Word for You set. Crumb cake, basic black and real red cardstock. Black Stazon and soft suede inks. Dotted ribbon punch, curly label punch, 1 3/8", 1 1/4", 1/8" and 1/2" circle punches, Newsprint DSP, dimensionals and hemp.
I really like how the tags turned out. They were 2 1/2" x 4 1/4". I got the music note from some craft store, I went to so many I forget where I got them. The judges thought they were awesome.
Here are the little notecards I put in:
A Word for You set. Crumb cake and basic black cardstock. Black Stazon and soft suede inks. Top note die, big shot, vanilla seam binding (holiday mini), Newsprint DSP.
These are 4x4. I made up little sets of 3. Each bundle had 2 that said thanks and 1 happy birthday.
I cut the DSP into 1 1/4" strips. I tried to get as much music on each strip. Then it was kinda funny because when they are cut up, you can't really (ok, I couldn't really) tell which way they went. So I hope I got them on there right.
Here was my other fun job:
driving the golf cart around. Super fun! These are our good buddies that came. I know they don't look too happy here. Thats because of my lack of understanding how my camera works and they had to take more than 1 pic. As you can see, the girls are used to it ;)
16 got put to work also. She actually looks fairly happy here. That didn't last long, let me tell ya.
Since we were the host band, we didn't compete but we did perform.......last. 9:00 pm. UGH! See that little drummer boy? He's mine. Notice how crystal clear my pics are? I need something with shake stability or something.
Here we are in all our glory.
Here is our Tournament Director. I think he's kinda cute. The biggest detail here to notice is that he is still smiling. Because of his planning and because we had so many volunteers, things went pretty darn smoothly. You did a good job, honey!
Here is a shot of my desk this morning. As I write this, it looks exactly the same. I'll get to it later.
Yes, that is our beautiful program from the tournament on top of the pile there.
Alrighty then. We are still trying to recover sleep. Who has a band tournament in the middle of the work/school week?
Thanks so much for stopping by.
Blessings, b.
Monday, November 8, 2010
just call me, Dr. Beth
Howdy!
It decided to be Fall today. It only got to 65 degrees and was windy and had big puffy clouds. Perfect! I hope your weather was as perfect wherever you are.
I want to show you another project we made last week. Everyone gives out gift cards, right? Well you might as well put them in something super duper cute. That makes the gift card extra special.
Christmas Classics and snowflake from Season of Friendship sets. Crumb cake, blue bayou and whisper white cardstock. Whisper white craft ink and old olive and real red markers. Dotted ribbon punch, 1/2" circle punch, 1/8" circle punch, crimper, crumb cake envelope, real red striped grosgrain ribbon, curly label punch, hemp, corner rounder and sticky rhinestones.
This is one of the first things I learned how to make almost 8 years ago when I became a demo. I'm such a loser I can't even think what its called; envelope gift card holder?, crimped envelope envelope?, uuummmmm........help me out here folks.
Anyway, you take a regular envelope and seal it. Then lop off 1 1/2" from the side. Then crimp the large piece. (You remember the crimper right? That tool you hardly ever use? Well dust that bad boy off). Then the little piece you cut off will fit on like a lid. Cute huh?
I used the snowflake from Season of Friendship and stamped snowflakes on the lid and then swiped the white ink pad along the edges. I punched a strip of Blue Bayou with the Dotted Ribbon Punch and stuck it inside the lid so just the little scallops showed.
Inside I made a little card. I used the markers to ink up the stamp. I used my AWESOME Tombow Multi glue to put a very thin line of glue on 3 sides of the whisper white and left the top open to slip the gift card into.
For the tag, I just cut a 2 1/2" x 2" piece of crumb cake and rounded the top corners. Added some snowflakes and punched ribbon. Check out the holly berries. Can you see? I used a red Sharpie to color in some of our Sticky Rhinestones! Can't you just see all different colored rhinestones on a stamped tree? I see one in my future.
Anyhow, I used my old olive marker to ink up just the leaves. Then punched out. Stuck on some holly berries and put it on the tag. I love it!
Put it all together and tied it up with the striped grosgrain. Tie on the tag and you're good to go. Super easy way to dress up a gift card. I like to hide the gift cards in the tree. That way they have to look for them. When they're all pretty like this, they just look like another ornament. Makes it more fun. For me anyway.......
Alrighty then, I know you're all dying for a garden update. Since the weather has stayed pretty warm here (it was 100 last week) the veggies are hanging on. But the bees seem to have left. So I did a little artificial insemination. Yes, you can just call me Dr. Beth from now on, thank you very much.
I had a few zucchini that were blooming and there were no bees around so I took it upon myself to do the deed. I had done this earlier in the summer and had great results. You just take a male flower, take off the petals and, (ahem) rub the stamin inside the female flower.
I know, I know, its all very embarrassing. But sometimes you just have to help. Become one with nature and all that.
Okay, thats all for today. Thanks so much for stopping by and putting up with me. You guys rock!
Blessings, b.
It decided to be Fall today. It only got to 65 degrees and was windy and had big puffy clouds. Perfect! I hope your weather was as perfect wherever you are.
I want to show you another project we made last week. Everyone gives out gift cards, right? Well you might as well put them in something super duper cute. That makes the gift card extra special.
Christmas Classics and snowflake from Season of Friendship sets. Crumb cake, blue bayou and whisper white cardstock. Whisper white craft ink and old olive and real red markers. Dotted ribbon punch, 1/2" circle punch, 1/8" circle punch, crimper, crumb cake envelope, real red striped grosgrain ribbon, curly label punch, hemp, corner rounder and sticky rhinestones.
This is one of the first things I learned how to make almost 8 years ago when I became a demo. I'm such a loser I can't even think what its called; envelope gift card holder?, crimped envelope envelope?, uuummmmm........help me out here folks.
Anyway, you take a regular envelope and seal it. Then lop off 1 1/2" from the side. Then crimp the large piece. (You remember the crimper right? That tool you hardly ever use? Well dust that bad boy off). Then the little piece you cut off will fit on like a lid. Cute huh?
I used the snowflake from Season of Friendship and stamped snowflakes on the lid and then swiped the white ink pad along the edges. I punched a strip of Blue Bayou with the Dotted Ribbon Punch and stuck it inside the lid so just the little scallops showed.
Inside I made a little card. I used the markers to ink up the stamp. I used my AWESOME Tombow Multi glue to put a very thin line of glue on 3 sides of the whisper white and left the top open to slip the gift card into.
For the tag, I just cut a 2 1/2" x 2" piece of crumb cake and rounded the top corners. Added some snowflakes and punched ribbon. Check out the holly berries. Can you see? I used a red Sharpie to color in some of our Sticky Rhinestones! Can't you just see all different colored rhinestones on a stamped tree? I see one in my future.
Anyhow, I used my old olive marker to ink up just the leaves. Then punched out. Stuck on some holly berries and put it on the tag. I love it!
Put it all together and tied it up with the striped grosgrain. Tie on the tag and you're good to go. Super easy way to dress up a gift card. I like to hide the gift cards in the tree. That way they have to look for them. When they're all pretty like this, they just look like another ornament. Makes it more fun. For me anyway.......
late sunflower
I had a few zucchini that were blooming and there were no bees around so I took it upon myself to do the deed. I had done this earlier in the summer and had great results. You just take a male flower, take off the petals and, (ahem) rub the stamin inside the female flower.
I know, I know, its all very embarrassing. But sometimes you just have to help. Become one with nature and all that.
Okay, thats all for today. Thanks so much for stopping by and putting up with me. You guys rock!
Blessings, b.
Monday, August 30, 2010
double digits, veggies, reading, stamping.............
Grace is now in the double digits. 10! Its amazing how quickly a decade can go by. This is the only child where I cut the umbilical cord, and she acts like its still attached. She is never very far from me. I love her alot.
Okay, I'll go ahead and fess up as to why I haven't posted on here in too many days, I was reading a book. Nothing else happens around here when I have a book to read.
The Mockingjay came out on Tuesday. Its the last in the Hunger Games series. So good! I'll have to read it again when there aren't so many distractions because I have a few questions about it. And see that face looking at you? I made that at Back to School night on Tuesday. 16 is taking ceramics and the teacher let us parents try our hand at one of their assignments. I call him Mr. Squarehead. Pretty cool!
A garden update:
The weather has been super duper hot around here.......until Saturday that is. Then is was only 79 and breezy all day. Just beautiful! Its going to get back up into the mid 90's by the weekend though. Poor veggies, they are so confused.
I pulled all the Anaheim Chilis off the plant. I roasted some for dinner the other night. YUM!
This box has the green beans on the very end here. I only planted those on Aug. 3rd. They are already climbing to the top of the fence.
1 zucchini. Thats it. This was a starter plant that I also planted Aug. 3rd. Its a very happy plant and has 3 other tiny zukes on it.
This is the red and green bell peppers, anaheim chili, yellow squash (seeds I planted Aug. 3rd) and cucumber. My poor cucumber is just struggling. Maybe next year.
This whole box isn't doing so great. The yellow squash are prolific but once they get to about 3 inches, they wither and die. I have 2 on there now about that big and hoping they make it. They tomato plants have had a really hard time this year between the dogs and cat and rain and who knows what else. Next year this box will be by the others.
This is what happens to sunflowers when its 109 outside and the dogs decide they need some nice wet dirt to lay in. I was so mad! They took out 4 plants that were almost 3 feet tall. See that plant on the end there? Those are my Thompson grapes that tried to die and I kept at them and now they are so happy! Hopefully next year I'll have grapes.
Okay, you ready for some stamping? I thought so. You are so patient with me. You guys rock!
No stamps! More mustard, cajun craze, very vanilla and basic black cardstock. No ink! Polka dot embossing folder, Newsprint DSP, curly label punch, 1" circle punch and 1 1/4" circle punch, vanilla taffeta ribbon, hemp and dimensionals.
No stamps and no ink! HA! I didn't even realize that until I was writing this up. I'm trying to find ways to use this DSP. I want so badly to use new stuff but it isn't here yet. Wait until you see! I used my little punch trick again on the border here. See here for for how I did that.
I didn't have a stamp that said what I wanted and was too lazy to print it up on the computer. So here goes the ol' sloppy handwriting. I used the 1" and 1 1/4" circle punches and the border was a little too thick so I cut it down with my scissors.
Okie dokie then, I'm going to try and get back on schedule here. No more reading.......for now. I have new goodies coming and I'm so excited.
Thanks for stopping by. You make me feel so special.
Blessings, b.
Thursday, August 12, 2010
gettin' punchy
Hello friends. Did you have a good day? Today was day 2 of my freedom. The kiddos went back to school yesterday. Ahhh.............its amazing how much more I can get done. Even my brain seems to work on all circuits. Its not totally the kids' fault. I'm just easily distracted by them. I kinda like them.
Anyhow, I did not get any stamping done yesterday or today. What? You heard me. I did stamp quite a bit on Tuesday and the last 2 days have been cleaning the house and planning. I would like to get a stamp class together for next month and I'm trying to think of projects to do and what I might need to order. That takes me forever! Give me too many choices and I shut down. Since I have uninterrupted time right now, I'm trying to forge ahead and make some decisions.
Tonight I wanted to show you what I made on Tuesday. Lookee:
Watercolor Trio set. Old olive, early espresso, tempting turquoise, perfect plum and whisper white cardstock. Elegant eggplant, tangerine tango, old olive and choc. chip inks. Large oval punch, curly lable punch, hemp and dimensionals.
I just love seeing a happy little stack of cards! I actually made 6 and they all went in the mail. Yay for me!
I wanted to use Tangerine Tango. I like this color. I used my blender pen to pick up the color from the ink pad. I had originally planned on matting the flower image with Tangerine Tango but then discovered, I didn't have that color cardstock. So I went to the color coach for advice. This is what it said:
Tempting Turquoise huh? Well, okay I'll try it. I like the way it turned out too. Learn to trust the Color Coach grasshopper.
Then I remembered I needed a birthday card for a sweet friend of mine and her favorite color is purple. YUCK!! Don't mean to offend anyone but, purple is so not my color.
So I whipped one up for her:

This is a 1 1/2" strip of cardstock and the Curly Label Punch. Put the cardstock so that it just touches both sides. Line it up with the middle and punch.
Now do the same thing. See how the one side just barely goes past the opening? Punch again.
Anyhow, I did not get any stamping done yesterday or today. What? You heard me. I did stamp quite a bit on Tuesday and the last 2 days have been cleaning the house and planning. I would like to get a stamp class together for next month and I'm trying to think of projects to do and what I might need to order. That takes me forever! Give me too many choices and I shut down. Since I have uninterrupted time right now, I'm trying to forge ahead and make some decisions.
Tonight I wanted to show you what I made on Tuesday. Lookee:
Watercolor Trio set. Old olive, early espresso, tempting turquoise, perfect plum and whisper white cardstock. Elegant eggplant, tangerine tango, old olive and choc. chip inks. Large oval punch, curly lable punch, hemp and dimensionals.
I just love seeing a happy little stack of cards! I actually made 6 and they all went in the mail. Yay for me!
I wanted to use Tangerine Tango. I like this color. I used my blender pen to pick up the color from the ink pad. I had originally planned on matting the flower image with Tangerine Tango but then discovered, I didn't have that color cardstock. So I went to the color coach for advice. This is what it said:
Tempting Turquoise huh? Well, okay I'll try it. I like the way it turned out too. Learn to trust the Color Coach grasshopper.
Then I remembered I needed a birthday card for a sweet friend of mine and her favorite color is purple. YUCK!! Don't mean to offend anyone but, purple is so not my color.
So I whipped one up for her:
Forgot to mention, this is a 4 1/4" square card.
Now, you might be saying, "Beth, how'd you get that groovy detail on the espresso piece?" Well let me
share that with you.This is a 1 1/2" strip of cardstock and the Curly Label Punch. Put the cardstock so that it just touches both sides. Line it up with the middle and punch.
See?
Now do the same thing. See how the one side just barely goes past the opening? Punch again.
Now you're getting it.
One more time.
Got it?
Its really easy once you get the hang of it. Try it. I like trying to find different ways to use what I have. Makes me feel smart.
Okay, one more thing I did. Remember this card?
Remember how I said it needed something?
Well, I gave that little birdie some more friends. I think it balances out the card better.
Alrighty then. Cleaning wiped me out today. I didn't even get done! Today was upstairs and tomorrow is downstairs. Lucky for me, I have a sorta small house. But Lordy, we can make a mess!
Thanks for stopping by and keeping me company.
Blessings, b.
Subscribe to:
Posts (Atom)
