Showing posts with label teeny tiny wishes. Show all posts

Monday, December 9, 2013

hello baby

I know, I know.  Why am I showing you a baby themed tag when its Christmas time?

Its just that I'm cleaning several piles off my desk in preparation for my Dec. Daily and it was sitting here. 

And babies are born at Christmas time too. 


Storybook Friends and Teeny Tiny Wishes sets.  Confetti white, marina mist and whisper white cardstock.  Pear pizzazz, marina mist, smoky slate, sahara sand, whisper white and black Stazon inks.  Deco label framelits, big shot, polka dot embossing folder, aquapainter, very vintage designer buttons and linen thread. 


We had a dual baby shower at work last week.  One boy and one girl.  Envision the girl tag with a melon mambo (because that is the only pink cardstock I have) tag.  There is actually a whisper white tag behind the marina mist one so I could write on it.  I used this in lieu of a card.


I just love the Storybook Friends stamp set.  For this, I inked up just the little lamby and left off the words.

You can hardly tell but I slid the whisper white ink pad across the raised polka dots.  

The Hubs thought the words, "hello baby" sounded like a pick up line.  Well, hello baby..................

Geez.

Alrighty then.  I do have lots of holiday type cards to show you but I really need to get my Dec. Daily up to date too.  I've got to get my rear in gear. 

Thanks so much for stopping by.

Blessings, b.

Wednesday, July 24, 2013

buttons......clay buttons......clay flower buttons?

Hey everybody!  I hope you all are having a super duper day. 


Pleasant Poppies, Teeny Tiny Wishes and the new Gingham Wheel.  Strawberry Slush, baked brown sugar, coastal cabana and whisper white cardstock.  Crisp Cantaloupe, whisper white and soft suede inks and daffodil delight and early espresso reinkers.  Big shot, delicate doilies die, very vintage buttons, 1 3/8" circle punch, neutral buttons, simply pressed clay, simply pressed molds, vanilla shimmer smooch spritz, crystal effects and natural twine.

I'm finally showing you the other card we made during group last time.  I hesitated because the buttons are now discontinued and I wanted to make the card again using current stuff. 

That is kind of hard to do when you don't have much current stuff........yet, (I put in an order today for all kinds of new goodies). 

This is what I came up with.  Let me know what you think. 


This was the original card we made together.  I'm really loving the Baked Brown Sugar color.  Its kind of a warmer Crumb Cake and we all know how much I love that.

I also dig on the Gingham wheel.  Now I can have gingham in any color I want!  This is using the new Crisp Cantaloupe.  Try spelling "cantaloupe" without looking it up.  Geez!  


Okay, so my sweet little brown flower button retired.  Now what?  I got some of the new Simply Pressed Clay and molds.  Grace went into overdrive making flowers and buttons. 

See the little white button?  That is clay.  I sprayed it with the smooch spritz to give it a pearlized look. 

Then I thought I'd try making a flower button.  It actually turned out okay but I don't really love it here.  I covered it in Crystal Effects to give it some shine. 

So lets try something else shall we?


This is the new Strawberry Slush paper.  Isn't it pretty? 

I asked Grace to make some buttons using Early Espresso ink.  She made some flowers too.  Only thing is, they look kind of purplely. I didn't make this one a button but I did cover it in Crystal Effects to make it shiny.  Okay, in this pic it looks gray but its purplely........really.  And I know "purplely" isn't really a word, just hang with me here.


I just wanted to show you that the gingham strip doesn't lay completely flat.  I put down some regular Mono tape on the back and used my fingers to gather it.  Make sense? 

So the first one is still my fave.  I did order new Neutral buttons today so when they come maybe I'll get another one made. 

Before you go I have 1 more thing to show you. 


  I still have several bunches of grapes on the vine and have 2 more squash ready to pull.  I cooked the pumpkins I pulled last week and froze the puree.  Things are moving along.  I'm surprised at how pokey the zucchini are being.  I will tell you about my tomato and bell pepper adventures another day.  UGH!

Okie dokie, thats it for today.  I have thank you cards to make and I have been pokey about that.  Bad Beth! 

Thanks so much for stopping by and hanging out.  You give me warm fuzzies. 

Blessings, b.


Thursday, July 4, 2013

Happy Independence Day

Holy Moly Batman!  I can't hardly believe how long its been since I've posted.  I knew it had been awhile but geez. 

Happy Independence Day everyone!  I hope everyone has something fun planned for today.  Most of my crew just left to go get some fireworks.  I hope they bring me back some snakes.  Remember those?

So today I have a bag tag to show you:


Blue Ribbon, Teeny Tiny Wishes and Banner Greetings.  Whisper white cardstock.  Real red, pacific point and black Stazon inks.  Delicate Doilies die, big shot, 1 3/8" circle punch, red baker's twine and polka dot parade DSP.

 Since its the 4th of July I thought I would go with a red, white and blue color scheme. 


 One of the first things I thought of doing with the Banner Greetings set was to use it for the ribbons on the Blue ribbon set. 

I still need to take pics of the cards we made at group last week.  I'll try and get that done today so I can show you. 


We have been enjoying summer.  I've gotten the front yard planted as much as I'm going to this year.  It is so hot now that anything else will have to wait for next spring.  I did discover that my Sweet Brooms have a problem.  A problem that seems to go hand in hand for them.  Had I known this, I wouldn't have bought them. 

Remember what they looked like when I planted them?


Yeah, look at it now;


I was thinking the poor little guy wasn't getting enough water but no.  Look closely...........


These are called Genista caterpillars.  They are all over my poor bush.  This is one instance where you gotta love the internet. 
 

The internet told me to get some Bacillus thuringiensis.  So I did.


This stuff was not cheap!  Anyway, I sprayed them and I'll have to wait until Spring to see if my poor little bushes come back. 

OY!  What a pain!

I've also taken pics of the vegetable garden.  I'll get those together too because I know you've just been waiting for an update on that ;)


I also wanted to turn you on to a site that the girls and I have been fascinated with,  geoguessr.com.  I saw this on The Pioneer Woman site.  It uses Google Maps and will drop you somewhere in the world.  You have to drive around looking at signs and buildings and guess where you are.  We have been having a competition on who can get the closest.  I currently hold the title with a .002 km.  Thank you very much. 

18 was in Italy (in the game)  and saw this tree:


She says it looks like Beyonce.  Maybe Beyonce with no head.  Anyway its been really fun.  We've seen things that we will never see in person.  Very cool and dare I say it?.........educational? 

WHOA!!!!!  dont say the "e" word during summer. 


Alrighty then, I'll be back soon with more stamping stuff.  Thanks so much for checking in and hanging out. 

Blessings, b.

Wednesday, May 15, 2013

please stay.....

Hey there!  How was your day?  I'm almost afraid to post something today.  The last few times I've posted I get notices that people are unsubscribing. 

Was it something I said? 

I know, I need a tougher skin.  But I really like it when you all come and hang out.  Even though I have nothing of importance to say. 

-big sigh-

Anyhow, I wanted to show you a sympathy card I needed to make. 


Blooming with Kindness and Teeny Tiny Wishes.  Whisper white and crumb cake cardstock.   White craft and Black Stazon inks.  White taffeta ribbon, vintage faceted buttons, linen thread, window frame framelits, lg. doily die, big shot.


I really had no plan when I set out to make this.  It started out one way and ended up another way.  I'm sure you all can relate.


Okie dokie.  I'm supposed to be working on my Artisan entries for Stampin' Up!.  "Supposed to"  are the operative words there.  The 3D items always kick my butt.  Come on inspiration!

Alrighty then, break time is over.  Thanks so much for stopping by checking in, I really appreciate it. 

Blessings, b.

Monday, April 29, 2013

validated

Yes, I have been validated. 

You know my addiction love for Crumb Cake cardstock, right?  Well, I actually went out of my comfort zone to make a card for our group last week.  I used Melon Mambo. 

Lord help me.  So not my color.

Then I made the same card using a larger sentiment so my ladies could see what it would look like should they choose to use a larger sentiment. 

And, I made it with Crumb Cake. 

I gave them the option of either color and do you know which color every one of them chose? 

Crumb Cake, thank you very much. 

 Ready?  Get your sunglasses on.


Blooming with Kindness and Teeny Tiny Wishes.  Melon Mambo, basic black and whisper white cardstock.  Melon mambo and black Stazon inks.  White taffeta ribbon, vintage faceted buttons, dryer sheets, dazzling diamonds glitter, big shot, clear scallop square die, white bakers twine. 


Our hostess this month wanted to do the dryer sheet technique.  You usually need a bold image behind to stand out and this was the first one I thought of. 

It actually came out just like I pictured it in my mind.  That never happens. 


Here you can kinda sorta see the glitter.  I'm not much for glitter and so didn't put too much on. 

The black piece opens so you can write on the inside.  A picture of that would have been good huh? 

Okay, want to know how to do the Dryer Sheet Technique?  I did not take pics but its pretty easy to explain. 

  1. stamp your image and let dry
  2. spread glue over the whole piece of cardstock.  I used Crystal Effects but you could use good ol' white glue.  Lay it on fairly thick.  You want it soak through the dryer sheet.
  3. place your used dryer sheet over the top and smooth out.  You can see where mine has a few bubbles in it.  I say it just adds character.
  4. cut around the edges.
  5. sprinkle glitter over the top.  
  6. let dry and you're done!

The glue and/or Crystal Effects will warp your cardstock.  After it dried I adhered mine to another piece of whisper white to stabilize it.


Ready for Crumb Cake?


Blooming with Kindness set.  Baja Breeze, crumb cake and whisper white cardstock.  Baja breeze and black Stazon.  Vintage faceted buttons, used dryer sheets, linen thread, big shot, clear scallop square die, dazzling diamonds glitter, crystal effects. 

Okay, so there isn't that much Crumb Cake on here.  The Crumb cake part is the part that opens for the message. 


Alrighty then, thats it from me today.  Did you watch Mr. Selfridge last night?  I'm just loving this show and so happy Mr. Crabb pulled the wool over on Mr. Grove. 

Thanks so much for stopping by and hanging out. 

Blessings, b.


Saturday, March 9, 2013

Lucky Charms

Happy Saturday!  I had kind of a lazy day today.  I had every good intention but I fell off the path somewhere along the way.  Tomorrow will be different.

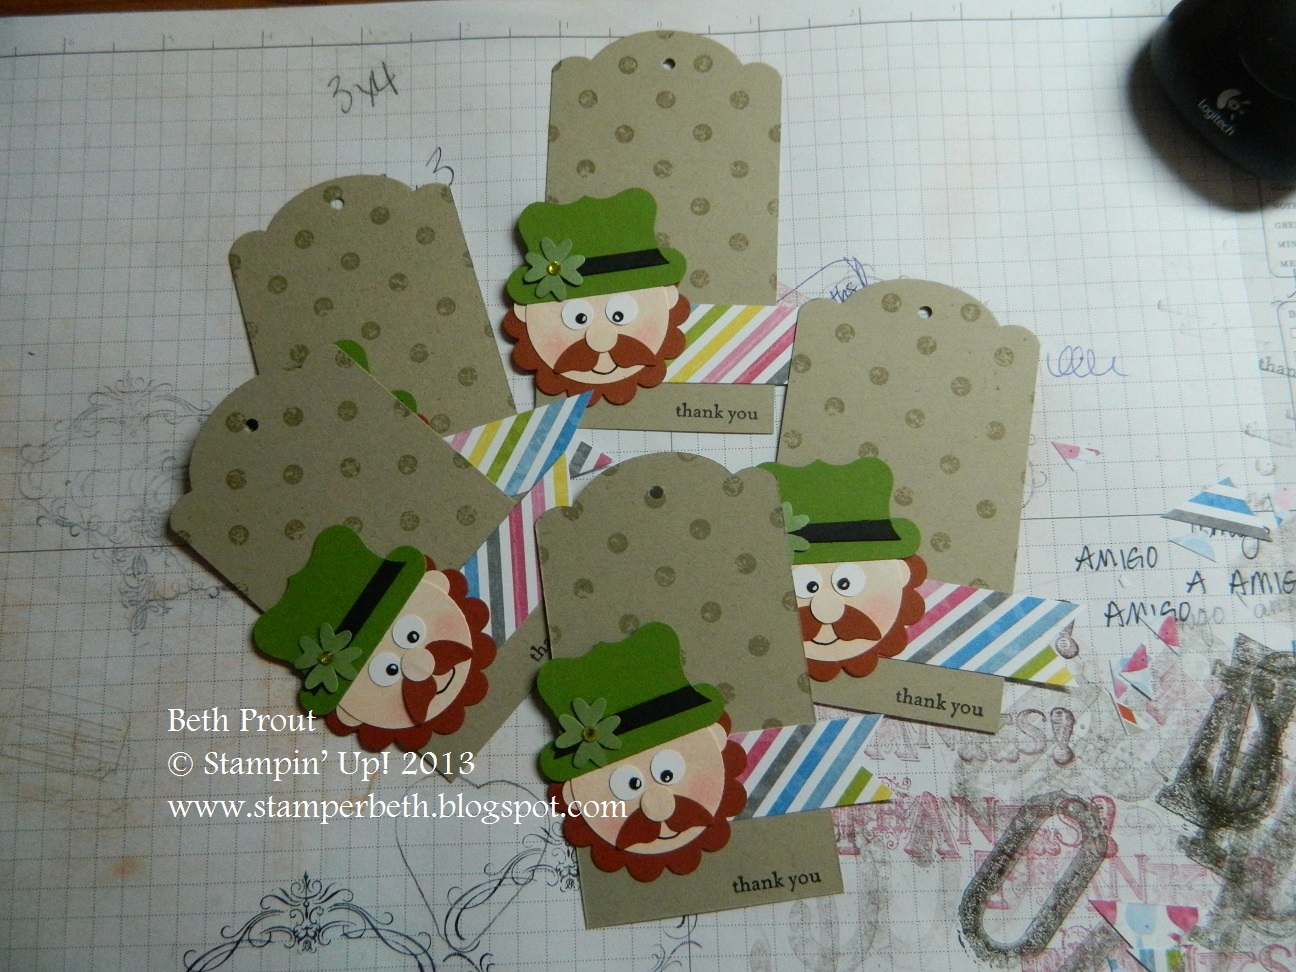
Today I wanted to show you the bag tags I made for my club ladies.  There are LOTS of pics so grab a drink and maybe even a snack.  I'll wait..................

Ready?


Teeny tiny wishes and distressed dots background.  Crumb cake, blush blossom, pretty in pink and black Stazon inks.  Crumb cake, cajun craze, whisper white, gumball green, wild wasabi and basic black cardstock.  Curly label punch, 1 3/4" scallop punch, owl builder punch, bitty butterfly punch, word window punch1 3/8" circle punch, big shot, label framelits, rhinestones and sunshine and sprinkles DSP. 

Thats alot of supplies there.  Whew!  Now that I look at the little guy, his eyes are a little wonky.  I guess he had too much green beer.

So I've put together a picture tutorial on how to make him.  Its pretty self explanatory but heck, I've got nowhere to go.

Lets do this!


I didn't have any Blush Blossom cardstock.  This color was retired a loooooong time ago but, you can still buy the marker in this color. 

So since I didn't have any cardstock, I decided to make my own. 

Take some white cardstock.......


..................and just rub your ink pad over it until you have the right depth of color you want. 

Rocket science huh?

And then, I didn't take a pic of this but punch out a circle with your 1 3/8" circle punch.


I used my 1 3/4" scallop punch to get this.  I lopped off the top but you don't really need to.


Stick your blush blossom circle on there.  Note:  I had decided I didn't have enough Blush Blossom ink on there so I made some more paper and punched a new circle later.


Now for the hat.  Cut a gumball green curly label in half on the long side, so the short sides are intact.


I just freehanded a strip of black cardstock and glued it on.  Trim it to fit.  You'll also notice I punched some gumball green with the word window punch. 


Then put them together. 


Now get out your owl punch and punch out 4 cute little hearts.  This is wild wasabi.  I love this owl punch although I will admit, I never make owls with it.


Now get your magnifiers on because you're old and can't see up close anymore and put a drop of glue on your hat.  This was not enough and I had to add more..........just so you know.  Place the hearts on the glue to form a shamrock.


When we started selling the rhinestones, I bought a whole pack of colored Sharpies just for this.  So color a rhinestone yellow and stick it in the middle of your shamrock.  I just wanted the idea of gold represented somewhere on my little guy.


Stick the hat your head.


Once again, use your owl punch to make some eyes.  Did you know you can just press the tip of your paper snips on the dot and it will pick it up?  Yep, works great.  Use your white gel pen to add some character.


Add some pretty in pink cheeks.  I did this before I decided he needed a mustache.  Don't forget to punch out some ears too.  I just used the owl punch again.


I had bought this Bitty Butterfly punch from the Spring Catalog in Jan. and I've never used it.  I think it makes the perfect bushy mustache.  I'm just showing you how I cut it apart here.


I don't have the Two Tags die so I rigged up my own.  This was a 2 1/4" x 4" strip of crumb cake.  Roll it through the machine only half way and then roll it back out.  Just so it cuts the top.


Nifty huh? 


Here they are all together.  Sorry about the dirty background paper.  Geez...what a slob!

I used the Sunshine and Sprinkles DSP from the Spring Catalog for the strip because it makes me think of rainbows.  Right after I had gotten them done and had handed out a few of the bags, I realized they would have been cuter on either a white or blue tag with white polka dots.  But I decided I wasn't going to redo them.  They are still cute. 

Alrighty then.   I'm heading to bed.  I want to be bright-eyed and bushy-tailed for everything I need to do tomorrow. 

Thanks so much for stopping by.  I love that you do that.

Blessings, b.


Saturday, December 22, 2012

no directions

Merry day before the day before Christmas Eve. 

We spent the day today at my in laws celebrating Christmas.  I love my in laws.  You don't hear that very often huh?  I do though.  They are awesome people. 

So today I wanted to show you 2 of the tags we made at the meeting.  The first one was from the Ornamental Elegance kit.  It is the ornament you see on the cover of the Holiday Catalog.  You can buy all the supplies to make the ornament and then of course you have the stuff to make a million of them if you want.  The kit made 10.  I thought it would be fun to make them at the meeting. 

Except the kit came with no directions.  OY! 

Took me awhile to figure it out and then thought to check out the You Tube.  I was on target. 

So here is the kit version:


It is very pretty and pretty big.  It says Merry Christmas on the back.  I didn't think to take a pic of that. 

The kit is sold out but if you'd like to know what supplies to order to make your own, just let me know.


Here is another tag we made.  Alot more simple.


Watercolor Winter and Teeny Tiny Wishes sets.  Naturals white and soft suede cardstock.  Garden green, crumb cake and early espresso inks.  Big shot, woodgrain embossing folder, wood buttons, vanilla seam binding, window frame framelits, 2 way glue pen, dazzling diamonds and linen thread.


I really like this one.  I left the tails of the ribbon long because I thought it would look pretty on a package. 


Pretty glittery pinecones.

Again, I didn't think to take a pick of the back.  I used Fabulous Phrases to stamp the "to" and "from". 

Alrighty then, I'm pooped.  Everyone and their mother was on the road today and it took forever to get home.  Stay safe out there. 

Blessings, b.

Thursday, October 18, 2012

Sorting Hat?

Hidey Ho!  I hope today finds you all just wonderful.  The weather is cooling off again.  It was 101 yesterday.  UGH!  (my children just informed me that I'm old because I always talk about the weather.  Well, I think the weather is interesting.....give me a break man.)

Anyway, this old lady has a little Halloween card to share. 

I don't send out Halloween cards.  Well I guess I do now because I'm going to send this to 18, along with a little care package.


Jack of All Trades and Teeny Tiny Wishes sets.  Basic black and very vanilla cardstock.  Black Stazon and more mustard inks.  Howlstooth and scarington DSP, 2 way glue pen and dazzling diamonds glitter. 

There was a card in the latest PaperCrafts magazine the used a layout something like this and so I thought I'd try it. 

Just cut strips of your DSP and lay them all wonky on the card and trim.  Great way to use up those little pieces.


You can see the glitter better here.  I can also see a cat hair in it.  Well she misses her cat so I'll just say I did that on purpose ;)

I had a hard time getting the hat to ink up completely.  Its the first time I've used this stamp and I guess I need to condition it.  (the best way to condition a stamp is to rub it with an eraser or stamp it with Versamark a few times) BUT, I decided that it looked kinda old and Sorting Hat-ish this way. 

I'm guessing everyone knows what the Sorting Hat is. 

I'm going to put this card in the box I'm sending her.  I've got some other goodies in there too.


Grace and I made her a bunch of goodies that she can give to her friends.  She'll give me a hard time that I made them but I'm hoping she will secretly enjoy it. 

Alrighty then, thats all for today.  I hope your weather is more Fall-like than around here. 

Thanks so much for stopping by and hanging out.

Blessings, b.

Saturday, October 13, 2012

halloween goodies

Hello everybody!  How was your day? 

Grace and I went shopping.  I hate shopping.  BUT we needed shampoo and stuff.  Of course we picked up a few things not on our list..........like caramel apples and.............underwear.  

We're friends right?  So I can share this with you.....right?

I've been needing some new undies for awhile now and everytime I happen to hit Target I look to see if they have what I want. 

And they never do. 

Its not like I want anything special.  Just white cotton.  (I know, I'm so boring)  Not neon.  Not nylon.  Not microfiber.  My underwear do not need space age technology!

Well today we went to the outlet mall and there was a store there that sold underthings (don't know the name of the store) and danged if they didn't have exactly what I wanted! 

I bought 2 packs.  You can never have too much underwear.

So anyway, I wanted to show you the hostess gift and door prize gift I made for that last workshop I did. 


Teeny Tiny Wishes set.  Black Stazon ink.  Tangerine tango, basic black and very vanilla cardstock.  Howlstooth and scarington DSP, neutrals buttons, hemp, 2 3/8" scallop punch, 1 3/4", 1 3/8 and 1 1/4" circle punches.

For some reason the picture will not get bigger. 

I used one of those paint cans from the $Spot @ Target.  I bought them a long time ago. 


I used my Simply Scoring tool to score the DSP every 1/4".  I really wanted black hemp because I thought it would look more like spider legs.  I punched the black cardstock with the scallop punch then punched it again lining up the points to the scallops.  Get it?


Fabulous Phrases set.  Black Stazon ink.  Naturals white and old olive cardstock.  Big shot, window frames framelits, howlstooth and scarington DSP, brights buttons, linen thread.

I made up a little door prize goodie bag with the leftover candy and put a couple of really old stamps in there too. 


You can see here where I folded the gray piece in on itself right behind the button.  Just to add a little bit of texture. 

I cut a thin strip of old olive cardstock to thread through the button and curled the top to resemble a stem. 


Alrighty then, thats it for today.  Thanks so much for stopping by. 

Blessings, b.

Tuesday, October 9, 2012

sour cream for everyone!

Hey there! 

On Sunday I had another workshop.  Yay me!

This time I didn't spill or ruin anything.  Yay me!

But I did forget 2 items.  Dang it! (And there was one other thing I messed up on the card we made but I'll tell you about that in a few days.  It would be so unlike me to have things go perfect.)

Lucky for me the hostess had one thing and the next door neighbor had the other thing.  So it all worked out.

Remember the sour cream containers that were so popular sooooooooooo long ago?   Well we made one.  A pumpkin one.


Jack of all Trades and Teeny Tiny Wishes set.  Tangerine tango, old olive and black Stazon inks.  Howlstooth and Scarington DSP, big shot, window frames framelits, black taffeta ribbon, word window punch, crimper and 1/8" circle punch.

Isn't it cute?  Love that crooked little smile.


Just the perfect size for some Skittles or M&M's or gummy worms or..............

I remember when I was first taught how to make one that I had never seen a sour cream container quite like this.  I guess some fast food places use this design.   I'm sure if I had a mind to I could have figured it out on my own but I though maybe some of you are like me and just don't have a mind to.  So I thought I'd do a quick little tutorial on how to make them. 

Lets begin shall we?


Mine uses a 5"x6" piece of paper.


Turn it over and lay a thin line of glue down the short end.  I used my beloved Tombow Multi glue.  This was actually too much.  A little goes a long way.


Roll it up.  You can rub the paper on the edge of your desk or bone folder to get it going in the right direction first to help you out.

One of the ladies at the workshop had the idea of using a toilet paper tube to use as a form and then you could just slide it off.


Line up your seam off to one side and stick a little glue in there and pinch closed.


Get it?


Remember your crimper?  That tool that is collecting dust in your bottom drawer?  Get it out and crimp the end just 2 or 3 clicks.


Cool eh? 


This would be the time to fill it with candy.......or jewelry......or a gift card (you might need to start out with a bigger size piece of cardstock).....or tickets......or money..............

Then squish the open end the opposite way of the closed end and lay some glue in there.......


and pinch it closed and crimp it.  Now you've got a nifty shape.


People will be in wonder at your cleverness.  Then just punch a hole in the end and tie a cute tag on and you're all good to go.


These are so easy and you can do them for any kind of occasion.  Just think, showers, wedding favors, you could make 25 of them and turn them into an Advent calendar, classroom treats......

Try using different papers too.  Vellum makes a really fancy looking one.  Its easy to make them bigger or smaller too.  Just start with a different size rectangle.


Okay, I've got one last pic to show you.  I was working in the garden........I know you've been wanting a garden update huh?.............and I saw that the top of this carrot was good size so I pulled it.  It wasn't fully grown yet but check it out:


HA!  A 3 legged carrot!  Oh my, why is it so easy for me to get a kick out of veggies.  Remember "Carrots in Love"?


Okay, I'll stop there.  Thanks so much for stopping in and hanging out.  You give me warm fuzzies........which is different and much better than the hot flashes.

Blessings, b.